EasyMorph Server allows quickly creating custom web APIs without coding, with just visual drag-n-drop workflows. This dramatically simplifies and speeds up designing custom APIs. Traditionally, designing a web API used to be a complex software development project that required a team of developers, testers, a project manager, etc. With EasyMorph Server, designing and deploying a custom web API is so much simpler and faster that it becomes a configuration task, instead of a software development project.
Here is a step-by-step guide on how to create and configure custom API endpoints with EasyMorph Server. The guide assumes that you have downloaded and installed EasyMorph Server and EasyMorph Desktop and have a basic idea of how to create visual workflows in EasyMorph.
What a web API can be used for?
Web APIs use the massively popular HTTP protocol and therefore can be used in many ways, usually to enable real-time machine-to-machine integration. Just a few examples:
- Accepting data submitted in forms on web-sites
- Retrieving information by a request from another application (e.g., return a price for a given product SKU)
- Saving information received from another application (e.g., receiving financial transaction data from another application and saving it in a database)
- Reacting to an event in another application (e.g., a new order was created therefore an email is sent)
How does a web API work?
A web API works using web requests (a.k.a. HTTP requests). In a nutshell, the principle is simple:
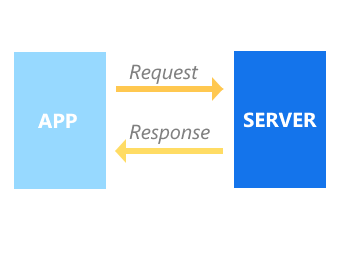
- An application sends a web (HTTP) request to EasyMorph Server. The request can have parameters and a payload (data).
- Based on the request parameters and payload (whichever is present) EasyMorph Server uses a visual EasyMorph workflow to calculate a web (HTTP) response that is immediately sent back to the application.
For example, a request can mean "Give me the technical specifications for the product whose SKU is 12345". In this case, the request contains the product SKU, and the response contains a data structure (e.g., JSON or XML) with the technical details for the product.
Web requests, in a nutshell, are also described in this article: Making your data better with web APIs.
It should be noted that:
- Server responds in real-time, i.e., the application waits for the response and expects to obtain it as soon as possible (most frequently, web requests are responded to within seconds, sometimes faster than 1 second).
- Requests are independent of each other. The Server can process many similar requests in parallel, sending an individual response to each request.
- While in theory, all requests of any type can be sent to a single Server web address (URL), in reality, a web API has different URLs (also known as endpoints) to serve different types of requests. For instance, one URL for customer data, one URL for product data, and so on.
Configuring API on EasyMorph Server
To enable custom API in a Server space, log into the Server as administrator, go to Space settings and turn them on.
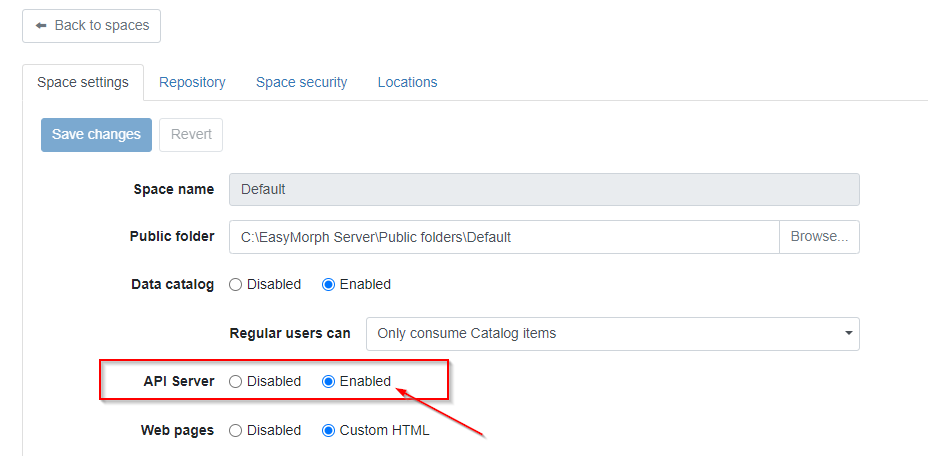
Note that in the Team edition of EasyMorph Server allows custom API endpoints in only one space, while in the Enterprise edition, any space can have a custom API.
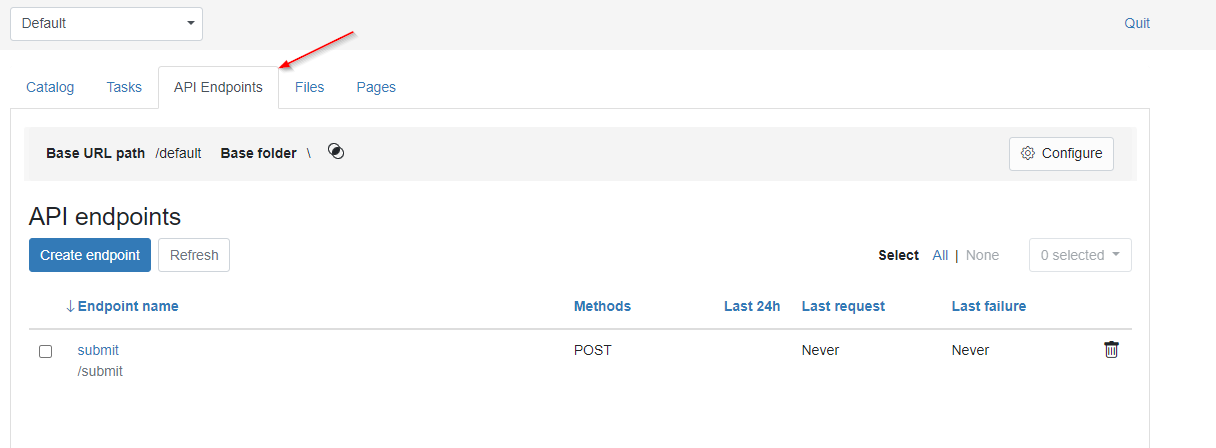
When enabled, you should see a new tab "API endpoints".
Creating an API endpoint
Press the "Create endpoint" button and enter the new endpoint's name and URL.
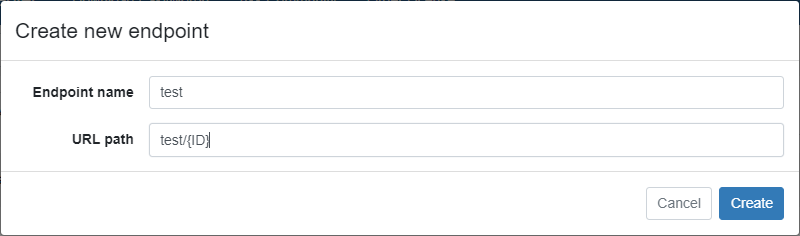
The endpoint name is any human-friendly name for display in EasyMorph. This name is only used to distinguish endpoints in EasyMorph from each other more easily. This name is not exposed to external applications and is not used anywhere outside of EasyMorph.
The endpoint URL forms the public URL (web address) of this endpoint that should be used by external applications for sending web requests. The final URL is concatenated from 3 parts:
- The Server web address (machine name + port as configured by your Server administrator) followed by
/web-api. For example,https://em-server.local:6330/web-api - The base URL path of the Server space. For instance
/default. The base URL path can be seen in the 2nd (from the top) screenshot above. To change it, press the "Configure" button (it can be seen in the same screenshot). - The endpoint URL path that was configured when the endpoint was created or in the endpoint settings. For example,
test/{ID}
Using the examples above, the full endpoint URL (for sending requests) would be:
https://em-server.local:6330/web-api/default/test/{ID}
Note: the
web-apipart can't be changed. Everything else can.
At this point, you might be wondering what the {ID} part of the endpoint URL is. This part is optional and is included for educational purposes. The endpoint URL can have multiple segments, for instance, test/abc/xyz. Any of these segments (except for the 1st one) can be replaced with a parameter name in curly braces. When the endpoint's EasyMorph workflow is executed, the workflow must have a parameter with the same name, and it will be assigned with the value of the respective segment path. (How to configure workflows for endpoints will be explained later in this article.)
For instance, let's assume the full endpoint URL is
https://em-server.local:6330/web-api/default/test/{ID}
Now, another application sends a web request to
https://em-server.local:6330/web-api/default/test/12345
In this case, the endpoint's workflow parameter ID will be assigned with 12345. If the endpoint doesn't have a workflow, or the workflow doesn't have a parameter named ID, the request will fail.
When the endpoint is created, you see the endpoint settings page.

Immediately after creation, the endpoint can already receive web requests. For instance, you can send a test request to this endpoint from Postman or from EasyMorph using the "Web request" action. However, at this point, the endpoint is not ready yet to process requests and produce responses, because it needs an EasyMorph project (workflow) to do that.
The 10 most recent incoming requests are stored as samples. There are two collections of request samples - successful requests, and failed requests. You can see requests in these collections in the tabs "Successful requests" and "Failed requests" in the screenshot above.
For instance, if you send a web request to the endpoint we just configured, it will appear in the "Failed requests" because the endpoint doesn't have an EasyMorph project yet and therefore the request will be received but will fail.
Creating an EasyMorph workflow
Now, let's create an EasyMorph project that will handle web requests sent to the endpoint and produce responses.
Before we start doing this, it might be a good idea to send one or more test requests to the endpoint so that we have them in the sample collection of failed requests.
Launch EasyMorph Desktop and create a new project. Make sure the Server Link is configured and points to the same space where the endpoint is created. It's required to retrieve sample requests.
If the endpoint URL has parameters (in our case it's one parameter named "ID"}, create workflow parameters with the same names. So in our case, the workflow should have one parameter "ID".
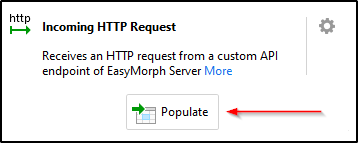
Add action "Incoming HTTP request" and press the "Populate" button.
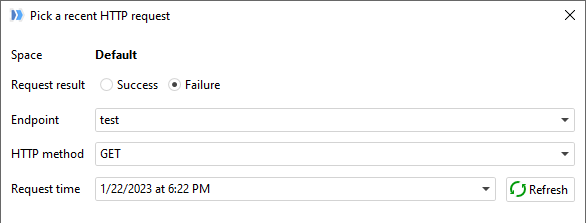
In the dialog, pick a sample request, press "Next" and "Apply".
The action produces a 1-row table with all metadata (URL parameters, request headers) and the request body (in column "Request-Body"). Now you can use EasyMorph actions and functions to calculate data that needs to be returned (if any).
The "Incoming HTTP request" is optional. If all you need from a request is a few values passed via parameters, you can assign workflow parameters manually with the necessary values.
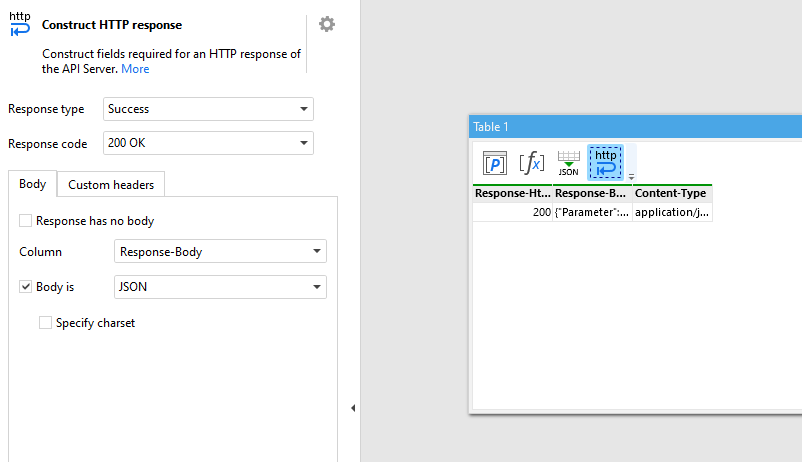
Regardless of whether the response should contain some data or not, you can use the "Construct HTTP response" action to construct a response. Put the action as the last step of the last table of the workflow. Mark the table as the default result table of the workflow.
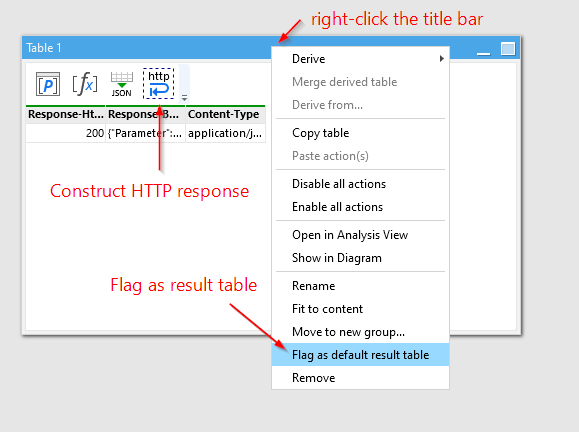
The "Construct HTTP table" produces a 1-row table that contains all the necessary metadata of the response and the response body (column "Response-Body"). For successful responses, pick response code 200 (OK) and specify the column with the response body (if needed). EasyMorph Server will use the 1-row table produced by the workflow to construct a web response. It expects columns with the names "Response-HttpCode" (mandatory) and "Response-Body" (optional). The rest of the columns will be constructed as response headers with respective names.
Save the project, and publish it to EasyMorph Server.
Finishing endpoint configuration
At this point, we have an endpoint that receives web requests, and a project (published on EasyMorph Server) that calculates a response. All we need to do is to put them together.
In the endpoint, settings select the project and assign project modules to HTTP methods. One project can have multiple modules, and each module can serve a particular HTTP method (verb) such as GET or POST
Note that if the endpoint URL has a parameter (such as "ID" in our example), then all modules should have a parameter with the same name.
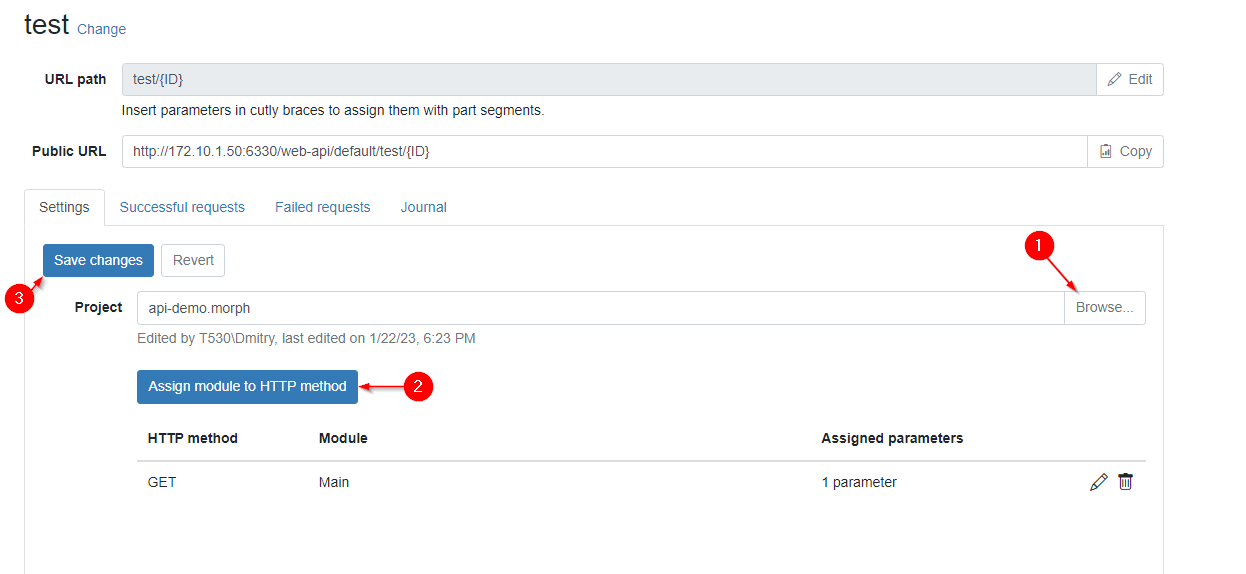
The endpoint is now ready to use.
What you have learned from this article
- How to configure a Server space to enable API endpoints
- How to create an API endpoint
- How the full endpoint URL is concatenated from the Server URL, base URL, and the endpoint URL path
- What are the collections of sample requests
- What the "Incoming HTTP request" action is for
- How to retrieve sample requests in EasyMorph Desktop
- What the "Construct HTTP response" action is for
- How to construct a successful HTTP response
- How to tie a visual EasyMorph workflow to an API endpoint
- How to configure an API endpoint to use a specific module of a workflow to serve a specific HTTP method (such as GET)
- How to assign a module parameter from an URL path segment
What's remaining outside of this article
The custom API functionality in EasyMorph is suitable for many advanced cases and scenarios not covered in this article. Quick remarks on some of the advanced features:
API authentication modes:
- None
- API key
- Basic HTTP
- Windows Identity (requires Active Directory and thus the Enterprise edition of EasyMorph Server)
Besides URL path segments, workflow parameters can also be assigned with:
- URL (query) parameters
- Request headers
- Request body
- Full request URL
- HTTP method
- IP address
- Request identity (when authentication is enforced)
- Custom values
Support for version control systems (such as git). Endpoint configurations are stored in XML files in the .endpoints directory and can be checked in git together with the respective EasyMorph projects.
Zero-downtime updates. The base folder of an API configuration can be switched to another folder with another (updated) API configuration. The switch happens instantly which allows updating API endpoints on the fly with no downtime. To create a new configuration, clone the current folder with the endpoints and projects and modify it in a separate environment (space). Then switch the base folder to the new configuration when it's ready.
API versioning. Use two or more spaces to have two or more versions of API working simultaneously.
Support for DEV/TEST/PROD environments. Use different spaces and even different Servers to separate DEV, TEST, and PROD environments. In PROD environments, you can disable editing endpoints and remove technical details from error responses.
In the initial release, CORS enables all sources. In future releases, we will add the ability to configure CORS settings in a more granular fashion.
A workflow can construct both successful and error HTTP responses (just remember to have a single result table). Also, a workflow can construct a response that initiates a file download or HTTP redirect.


