If you're reading this article it's safe to assume that you already have experience of working with data coming from spreadsheets, text files, and possibly, databases. What might be new for you is dealing with data from so called web (REST) APIs. Web APIs can be extremely helpful because they can provide valuable information that doesn't exist in your corporate systems. Just a few examples of information/services web APIs can provide:
- Public holidays
- Exchange rates
- Address validation
- Language detection
- Phone number validation
- Real-time and historic stock data
- VAT rates for EU countries
- IP geolocation
- Census data
- Corporate entities database
- Sentiment analysis
- Transportation and transit data
- Prediction and forecasting with AI and machine learning
Adding such information to your corporate data may significantly improve it and provide a substantial value. As the world is quickly moving towards web-based applications (a.k.a. cloud apps, SaaS), more and more useful APIs appear every day. Learning how to work with them is a good skill to have.
Below, I'll explain what a web API is and how you can add value to your data using web APIs. As you can expect it, it's all possible to do with EasyMorph even if you're not a software developer or IT expert. During the explanation, I will be touching a few technical details but you should be able to get an idea how things work even if it's all Greek to you.
What's a web API
The term API emerged in software development. It stands for Application Program Interface. When a human works with a software application, s/he typically interacts with the application by the means of its UI: clicking buttons and hyperlinks, typing in information, scrolling, dragging items, and so on. As more and more software applications appeared it soon became clear that it could be very beneficial if certain (or all) operations in an application could be performed by another program, instead of a human.
However programs can't interact with programs the same way as humans do -- e.g. by clicking buttons and scrolling mouse wheels. While there are tools that emulate user behavior by analyzing what's shown on screen, it turned out to be not reliable and suitable for wide use.
It was decided that in order to make it more convenient to access an application's features and functionality from another application the former should implement an interface that can be programmatically called by the latter. And that's how application program interfaces were born.
There are different types and technologies that can be used to design an API. Web APIs have become very popular because they use the same proven and well standardized technology that works under the hood when you browse internet - the HTTP protocol.
How to obtain data from a web API
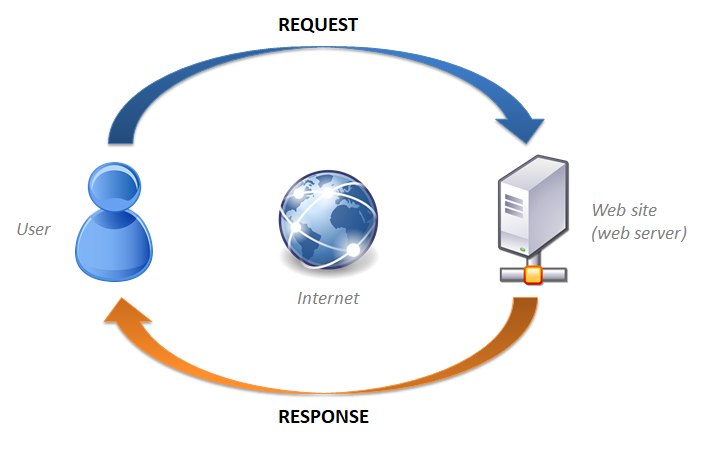
In the most simple case in order to obtain data from a web API you need to "open" a particular web page (URL), except not in a browser but in application such as EasyMorph. When you open a web page in a browser, under the hood the browser sends to the web site a so called HTTP request - basically a small text message formatted in a certain way. The web-site sends back a response which in this case is a web-page.
In a browser you only provide a web address (URL) when you open a web page (the remaining part of HTTP request the browser configures automatically). However, when you want to extract data from an API programmatically, in addition to a URL you will need to include into the request two more pieces of information that can't be configured automatically: the desired response format and an API key. Let me explain what that is:
Desired response format
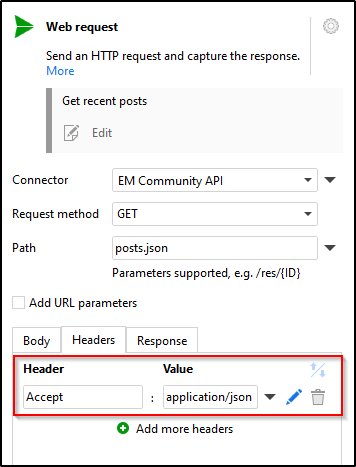
When you open a web page in a browser, it secretly tells the web-site you're trying to reach that it expects to receive back a web page. Because browsers are designed for humans they display pages that are formatted in a human-friendly way (the HTML format). However for applications this format is not very friendly because it's typically poorly structured and bloated with unnecessary markup. Therefore, applications typically obtain data from web-sites in application-friendly formats such as JSON (pronouced as "jay-son") or XML. When you construct a web request you need to indicate that the expected response format should be JSON or XML. This is done by setting the Accept request header to "application/json" or "application/xml". If that sounds scary - it's okay. Just remember that it's a request header named "Accept". Look for headers in EasyMorph in action "Web request" (see screenshot below).
API key
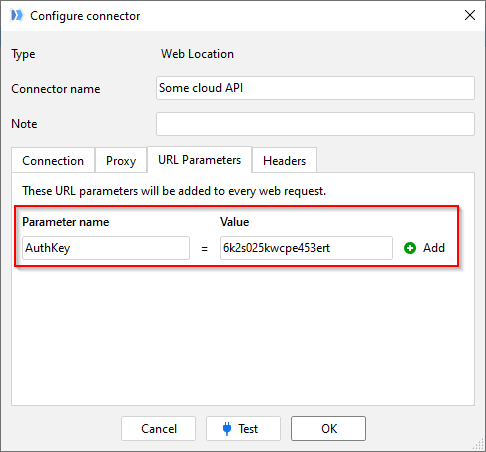
Sometimes, when you open a web-page in a browser the web-site may ask you to log in first for authentication and authorization. This is another example of a mechanism that was designed for humans but not so much for applications. While in rare cases it may still be possible for applications to get authenticated using a login and a password (so called basic HTTP authentication), most web APIs do authentication using API keys (a.k.a. authentication tokens, secrets, API tokens, etc.). An API key is usually a randomized text string consisting of letters and digits, e.g. "6k2s025kwcpe453ert". Before using in web requests, an API key should be generated first by the website you're going to access via its API. This typically can be done in your account profile on that site when you're logged in (as a human). Look for section "API keys" in your profile, or similar.
Once you get an API key, specify it in the "Web location" connector in EasyMorph. Note that there are 2 ways how an API key can be specified: either as an URL parameter or as a request header. Consult the website API documentation which way to use. EasyMorph supports both ways.
GET and POST requests
Finally, a few words about the two most common types (technically, HTTP methods) of web requests: GET and POST. There are more HTTP methods than these two, but those are less frequently used. So, what's the difference between the two? A GET request is arguably the simplest form of a web request. All the requested information (such as product ID) is contained right in the request URL, for instance
https://someservice.com/api/v1/product/1234
GET requests are suitable for simple requests. They also never modify data on the remote server. They are simple, lightweight, and safe. GET requests don't have a body . They consist of only headers and a URL. When you type in a web address in a browser and press enter - under the hood the browser sends a GET request to the specified address in order to retrieve the requested web page.
POST requests is a more heavy-weight thing and also more versatile. POST requests have a request body (more on that later) and can be used for both obtaining data as well as creating a new record in the remote system. When you submit a form somewhere on the internet, most probably under the hood the browser sends the form data to the web server using a POST request.
The body of a POST request to an API is typically a JSON (i.e. JSON object). Simple JSONs can be created right in the "Web request" action in EasyMorph. More complex JSONs can be constructed using the "Construct JSON" action (see example). Remember, because POST requests can potentially modify data in the remote system (when configured so) they are not considered safe, so be extra careful with them.
Now you have all the basic knowledge you need to send your first web request with EasyMorph. Let's do it:
How to obtain data from a Web API in EasyMorph
To send a web request with EasyMorph you will need the following:
- EasyMorph version 4.0 or above - download it
- The "Web location" connector with an API key configured
- The "Web request" action - see the web-help on it, or the "Iterate web request" action which simplifies sending multiple requests at once.
Once you run the "Web request" action and receive a response (in JSON or XML format) from a web API, it can be parsed using the "Parse JSON" action, or functions jsonvalue() and xmlvalue() as well as the regular EasyMorph actions.
Meanwhile, these examples can help you get started with web requests:
Example: use of Web Request and Iterate Web Request with the Community forum API
Example: Getting public holidays from an API with Web Request
Example: obtaining stock price history from web API
After the necessary information is extracted from a response it can be merged with the rest of your data using the usual EasyMorph actions - Merge, Lookup, etc.
Note that EasyMorph comes with a pre-installed example "Community users" that demonstrates the use of actions "Web Request", "Iterate Web Request" and "Parse JSON".