Microsoft Power Automate provides a no-code approach to build powerful automated workflows and connect thousands of services.
There are few licensing options:
- free license included within Office 365 Business subscription: Basic, Standard and Premium
- Power Automate subscription based on number of users
- Power Automate license based on flows count (with unlimited numbers of users).
Step 0: Configure an EasyMorph Gateway
EasyMorph Gateway is your cloud outpost to securely receive data or webhook notifications from power automate and later via EasyMorph.
Creation of Endpoint described here: How to configure a connection to EasyMorph Gateway
Step 1: Create a custom connector in Microsoft Power Automate
While we are working to certify our connector with Microsoft, early adopters can create a custom connector for Power Automate Easymorph integration following few easy steps.
- Save the file with OpenAPI definition for Easymorph Endpoint to your local computer: ms-power-automate.json
- Open MS Power Automate home screen
- On the main menu at right, navigate to Data -> Custom Connectors
- At the top right corner, you will see a button "New custom connector," and start the wizard by clicking the "Import an OpenAPI file" option
- On the next step, please provide a connector name, e.g.
Easymorph Endpointand file downloaded in step 1. Press 'Continue' - General information step is optional. All critical settings are imported from a file automatically, but you can specify connector branding
- Upload connector icon: you can use https://dev-poll.easymorph.net/em-logo.png
- Icon background color: #ffffff
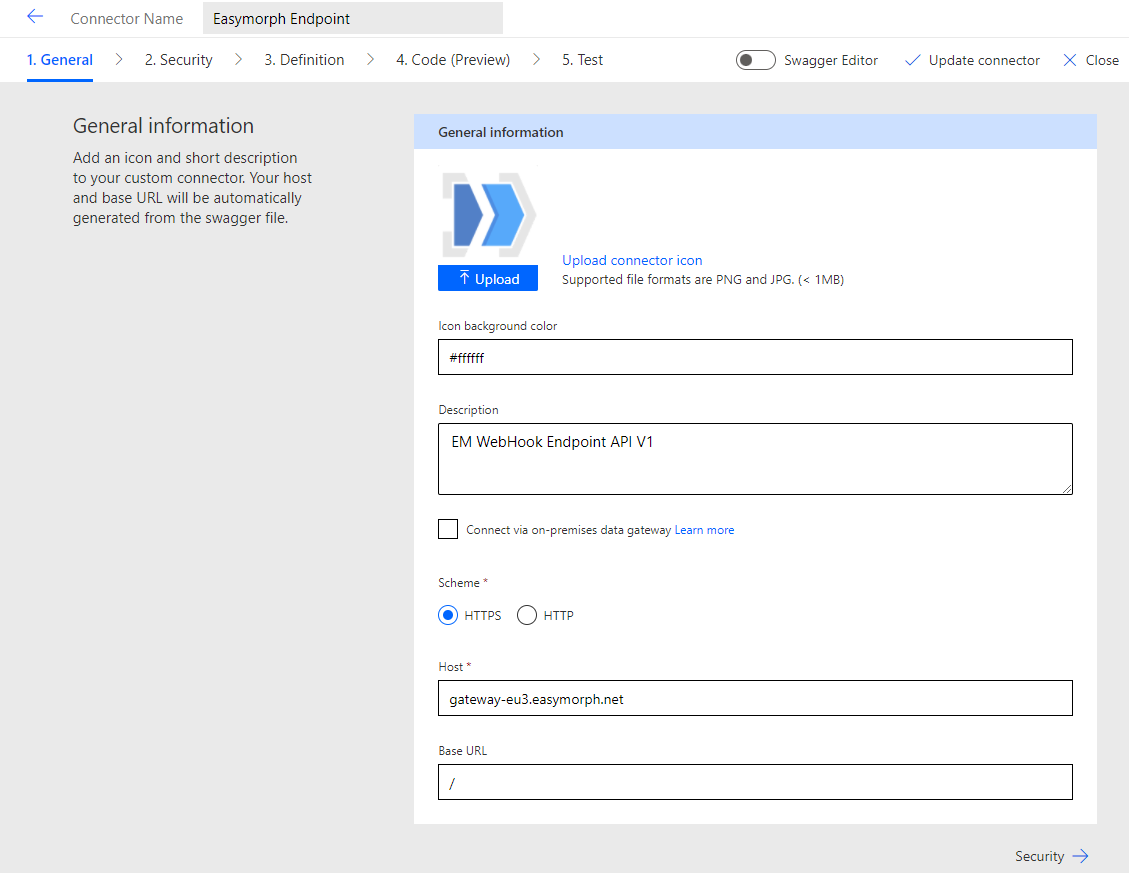
- Press "Create connector" at the top of the wizard to finish.
Here is a link to Microsoft help page in case you are looking into additional details about custom connector creation: Create a custom connector from scratch | Microsoft Learn
Step 2: Using Easypoint Endpoint connector in your flow
- Navigate to "My flows."
- Press "New flow," "Automated cloud flow."
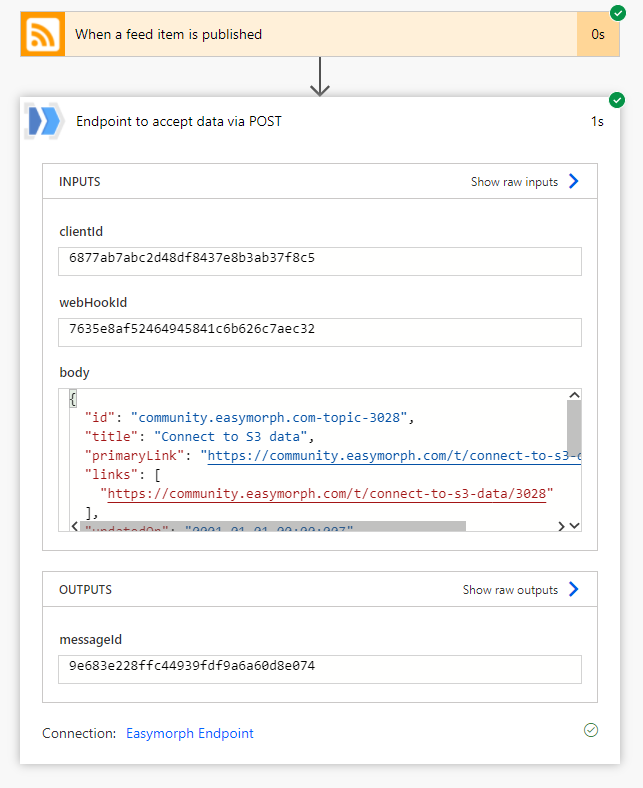
- Choose some triggers for your flow. For this example, we can use the RSS trigger "When a feed item is published." RSS is a technology that allows users and applications to access updates to websites in standardized, computer-readable format.
- Use Easymorph community forum RSS: https://community.easymorph.com/latest.rss
- You now have a trigger defined. Power automate will occasionally check RSS and invoke flow once a new topic is published.
- Add one more step by pressing "+ New Step" button
- Choose the "Custom" tab, "Easymorph Endpoint." You also should choose an action, which is "Endpoint to accept data via POST."
- Now, you need to specify connection parameters obtained from Step 0. Please paste your customer Id and WebHook Id.
8a. Optionally, you can add an authorization for your Endpoint, which we will discuss in a separate section - Pass data via the "body" parameter. Most triggers have a "body" that contains a JSON with all fields encoded as JSON.
- Press "Save."
Once a new topic is published on Easymorph Community, your Endpoint will receive JSON with data about a new post.
Configuring Endpoint Authentication for PowerAutomate
EM Gateway allows you to pass data and read data to/from Endpoint.
Reading data from your Endpoint is secured via a private key stored on your EM Server; no additional configuration is needed.
This topic covers additional security to ensure that none can pass data to your Endpoint (and, potentially, screw up your workflows).
Gateway Endpoint supports two authentication modes: by additional URL parameter or by an HTTP Request Header (preferred).
by Parameter:
Configure Endpoint on EasyMorph Server:
Use the following parameter name: authParameterValue
Put the same secret into Parameter Value (EM Server) and authParameterValue (Power Automate)
by Header:
Configure Endpoint on EasyMorph Server:
Use the following header name: authHeaderValue
Put the same secret into Header Value (EM Server) and authHeaderValue (Power Automate)