Prerequisites
To enable HTTPS on EasyMorph Hub, you first have to install an SSL/TLS certificate through the EasyMorph Hub Monitor.
You can use an existing certificate or order a new one from a Certificate Authority (CA). EasyMorph Hub doesn't require subdomains for its main domain, so any type of certificate (single-domain, wildcard, or SAN) can be used. Please ensure that the certificate covers the domain used to access your Hub, either as the primary subject or via a wildcard entry.
For the next step, you'll need both the private key file used to create the Certificate Signing Request (CSR) and the public certificate file sent to you by the Certificate Authority (usually in .crt, .cer, or .pem format).
If the Windows operating system that runs EasyMorph Hub already has the required certificate installed, you can skip the next step.
Creating a .pfx file
EasyMorph Hub expects a file in the PKCS#12 format (usually with a .pfx or .p12 extension) that bundles both private and public keys together.
You should compose a .pfx file from the public certificate file (.crt, .cer, or .pem) and the private key file (usually .key).
For example, you can do that using OpenSSL, which should be downloaded and installed separately.
Here is the OpenSSL command to create a .pfx file (assuming that your certificate file is named cert.crt and the private key file is named private.key):
openssl pkcs12 -export -out result_file.pfx -inkey private.key -in cert.crt
This command will ask you for a password for the .pfx file. Please remember this password. You will need it for the next step.
And here is the command if you have additional certificates (a certificate chain):
openssl pkcs12 -export -out result_file.pfx -inkey private.key -in cert.crt -certfile chain.crt
Enabling HTTPS
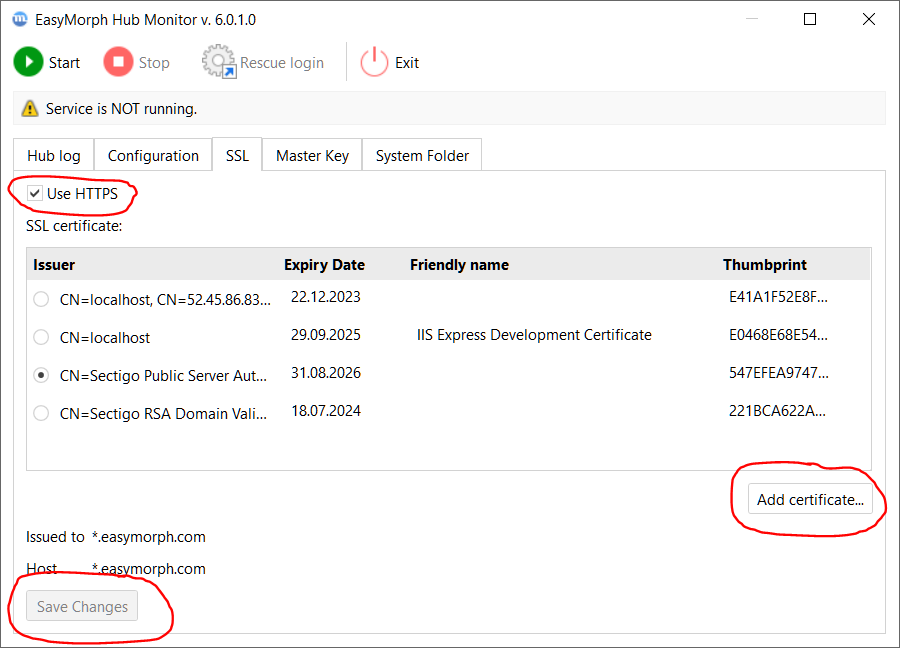
Now you need to install the created .pfx file (or choose a previously created one) in the EasyMorph Hub Monitor. Please follow theres steps:
- Stop EasyMorph Hub using the Stop button in the Monitor.
- Switch to the SSL tab.
- Press the Add certificate button and specify the path to the
.pfxfile created in the previous step, and the password for that file.- Alternatively, choose one of the existing certificates.
- Make sure that the correct certificate is selected and no certificate-related errors are displayed by the Monitor.
- Check the Use HTTPS checkbox.
- Press the Save changes button.
- Start the Hub using the Start button in the Monitor.
Now you should be able to access the server using the HTTPS protocol (i.e., https://your_subdomain.your_company.com).
Please keep in mind that after switching to HTTPS:
- Old external links that start with http:// will no longer work, and you'll have to update them manually.
- The same applies for existing EasyMorph Hub connectors.
- You might have issues accessing the Hub as localhost from the same machine, either from the browser or from EasyMorph Desktop:
- The browser will show warnings about an incorrect certificate (which can be ignored).
- The Hub link feature in EasyMorph Desktop will either require switching to the domain name or allowing a self-signed certificate using the Configure dialog near the Require SSL option.
- The EasyMorph Hub connectors will require either switching to the domain name or allowing self-signed certificates in the Application settings => Security settings dialog.