Custom actions are one of the biggest new features introduced in EasyMorph version 6. The ability to create your own actions which can then be used in EasyMorph workflows offers lots of benefits, including:
-
Making logic reusable across multiple workflows and by anyone in your organization. Plus, there’s only one place to update the logic if needed.
-
Create business specific data transformations or validations.
-
Wrap complex technical things, such as extracting data from APIs, making them simple to use by less technical colleagues.
-
Make complex data science and statistical analysis simple to understand by wrapping Python scripts into custom actions.
-
And much, much more…
Custom Action Basics
Before diving into the how, let’s cover a few basics about custom actions.
To be able to use custom actions, you need to have EasyMorph Hub (formerly EasyMorph Server) Starter edition or above. And to have your EasyMorph Desktop linked to it. Why this is the case will become clear in a second.
Another important point is that custom actions are EasyMorph workflows. This means when creating them you have available all of the data preparation and automation capabilities workflows offer, including connecting to third-party systems, sending and receiving emails, working with REST APIs, running Python or Powershell scripts, and more.
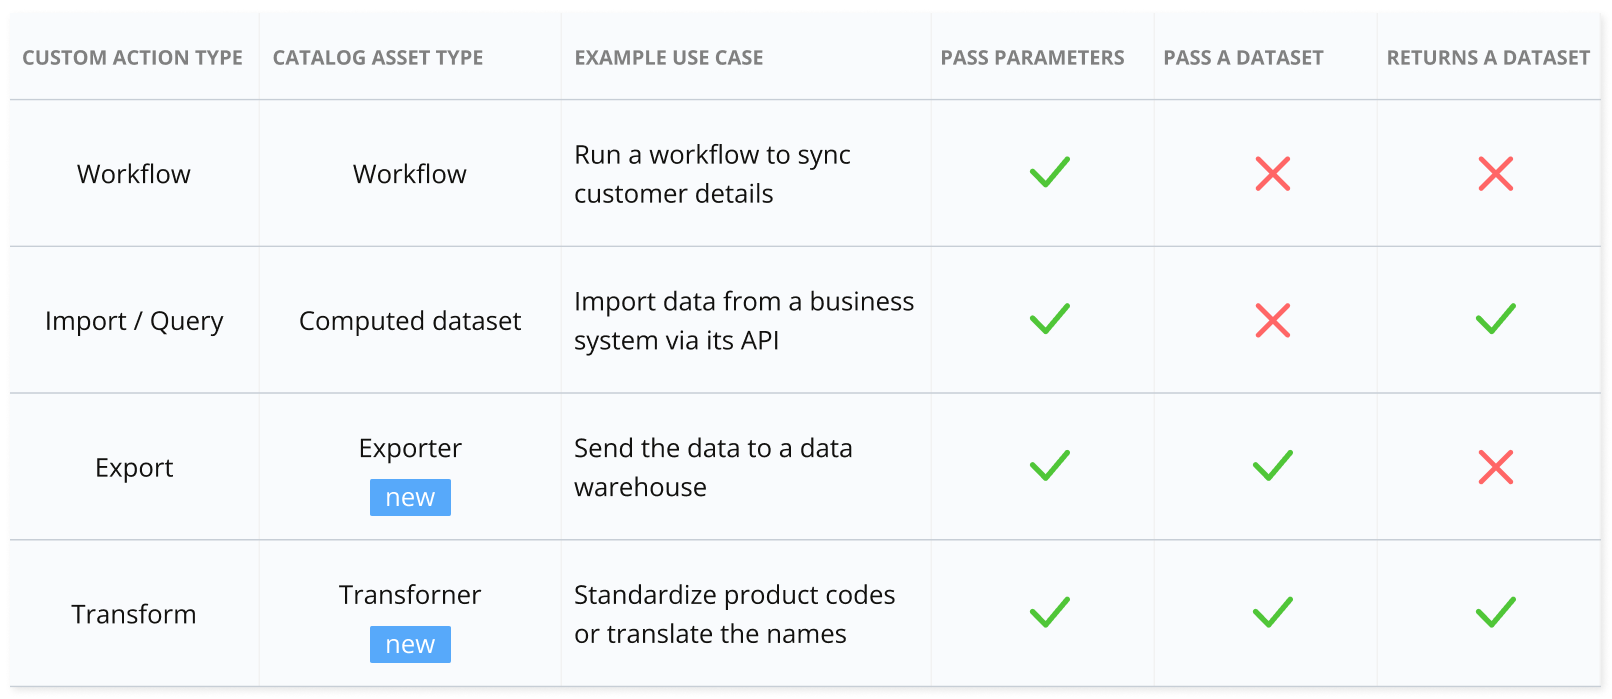
Lastly, custom actions are EasyMorph Hub Explorer Catalog assets. The Catalog supports many types of assets, 4 of which can be used as custom actions. Each of these types supports slightly different features, such as whether they expect data to be passed to them or whether they will pass data back.
Workflow
Workflow assets can be passed parameters but don’t allow you to pass data to them and don’t allow you to pass data back. They’re perfect for tasks such as running a workflow to sync business systems before trying to extract data from them.
Import / Query (Computed datasets)
Computed dataset assets can be passed parameters but not a set of data. They do return data however. This makes them perfect for extracting data from a system or from an API and returning that data so that it can be transformed as needed. You can therefore think of custom actions based on computed datasets as being like any of the inbuilt actions “Import…” actions or those available when you click the “Add data” button in EasyMorph Desktop.
Export
Exporter assets do the opposite of computed datasets, allowing you to pass parameters and a dataset but which don’t pass back any data. This makes them ideal for tasks such as sending data to a database, data warehouse, API, etc. They’re like any of the inbuilt “Export…” actions.
Transform
And lastly, Transformer assets allow you to pass parameters and a dataset, and also pass a set of data back. This makes them perfect for tasks where you wish to transform, modify or cleanse a set of data in the same ways as any of the inbuilt “Transform” actions.
The data flow of custom actions
Because custom actions are held on EasyMorph Hub, if a workflow using the action is run on the Hub (such as by a Task) then the data passed to and from it remains on the Hub.
However, if the workflow using the custom action is run from EasyMorph Desktop or EasyMorph Launcher on a different machine, then data must be passed between the two. Which direction(s) the data flows depends on the type of custom action. For a Transform action, the data would flow as follows:
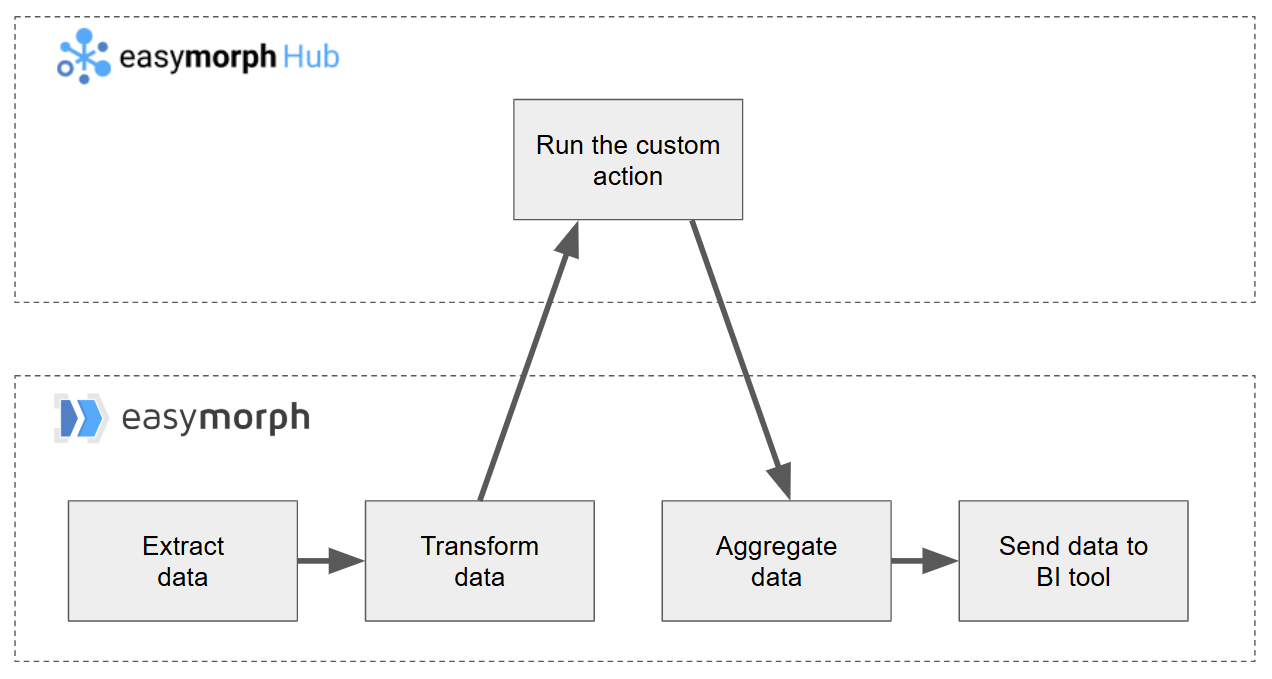
Because EasyMorph compresses all data it is working with, unless you are working with extremely large datasets, you shouldn’t notice much of a lag because of the transmission. It’s worth noting for large data volumes however.
Custom action security considerations
Because of this transmission of data, you may fear that this might pose a security risk. Don’t worry, all data passed between the machine running EasyMorph Desktop and the EasyMorph Hub server is encrypted.
In fact, custom actions offer some security improvements. For a start, the actions use connectors stored in the EasyMorph Hub repositories, so important database and system credentials used by custom actions never need to be shared with those who use them.
And because users don’t have these credentials, it is impossible for them to craft and run a SQL statement to extract data you don’t wish them to. You could even prevent them pulling too much data from a database or system causing performance problems within critical business hours.
Creating custom action workflows
I’m going to assume that if you are looking to create and use custom actions then you are likely already well versed with at least the basics of creating workflows in EasyMorph. If not, then I would highly recommend starting with working your way through the “Workflow basics” section of the EasyMorph tutorials.
Let’s take a moment to look at a few of the important features and actions which help to make custom action workflows.
Parameters
As we can see below, parameters which we create in a workflow will become the settings for the custom action.
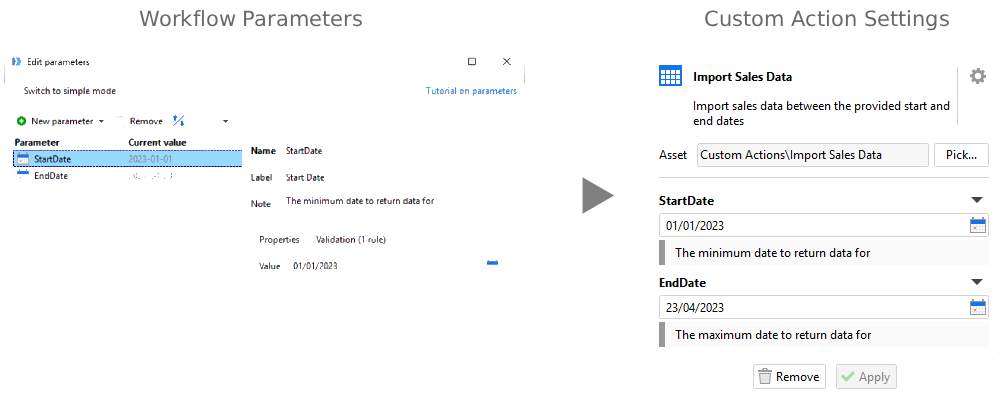
All parameter types are supported in custom actions. The only one which won’t appear as a setting are calculated parameters as users can’t set these at run time.
There is one parameter type which was added in version 6 which is specifically intended for use within custom actions. “Column selector” parameters are used in Export and Transform custom actions (although you can create them in any workflow) and allow the user to pick one or more fields from the dataset which is passed to the custom action.
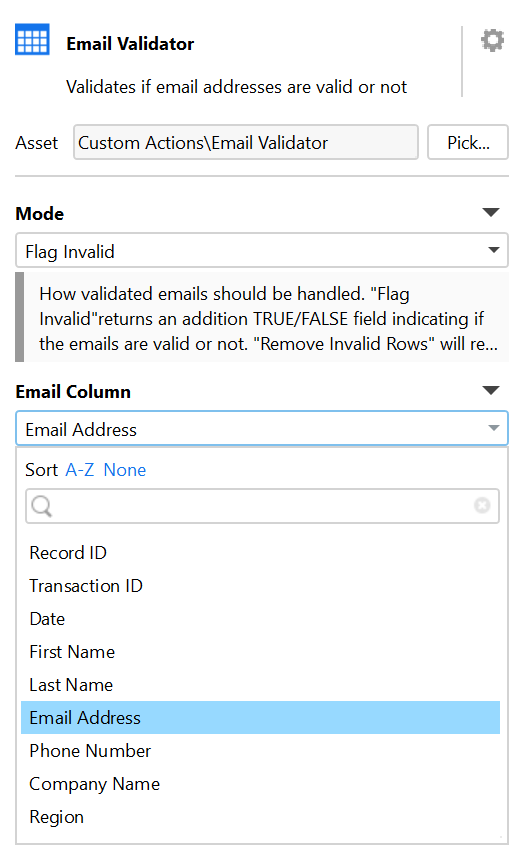
There will be at least one other new parameter type coming soon which is specifically intended for use with custom actions. Keep an eye on our blog for upcoming release announcements.
The start module
If you aren’t familiar with modules in EasyMorph workflows, I strongly recommend working through the tutorial on them in our website.
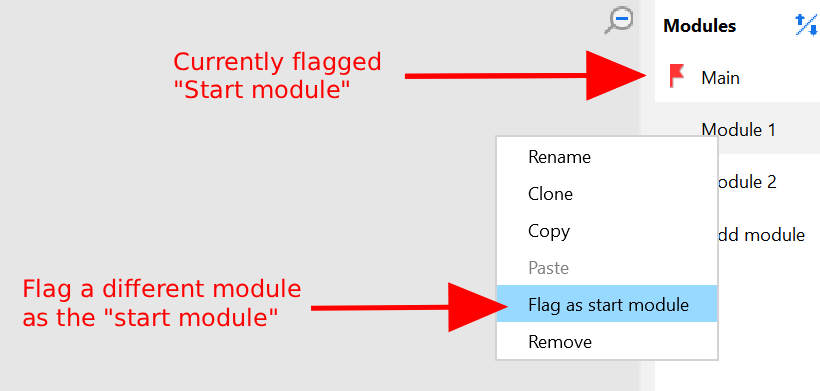
One thing to note is that workflows can have many modules, but only one of them can be flagged as the “Start module”. When an EasyMorph workflow runs, it doesn’t run every workflow in it automatically. Instead, it begins by executing the start module which can call the other modules as needed. It is therefore important to take note of and set the start module when you are creating custom action workflows.
The currently set start module will appear with a red flag against it in the right-hand module bar. If you right-click on a module and select “Flag as start module” then you can set any other module as the start module.
Receiving data into a custom action
There is nothing new about how custom actions can receive a set of data. They use the same capabilities which are available when using the Call another module/project action to run another workflow and pass data to it.
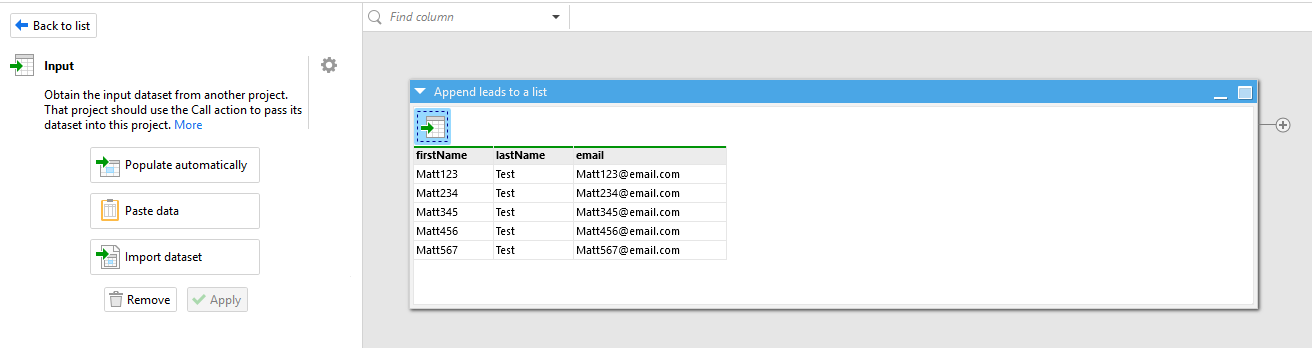
When added to a workflow, the Input action outputs the dataset which is passed to it, including when the workflow is a custom action. You can then build the rest of the workflow using the data it receives.
One issue some people have when trying to use the Input action is that when you are building the workflow, it isn’t being called and thus there won’t be any passed set of data.
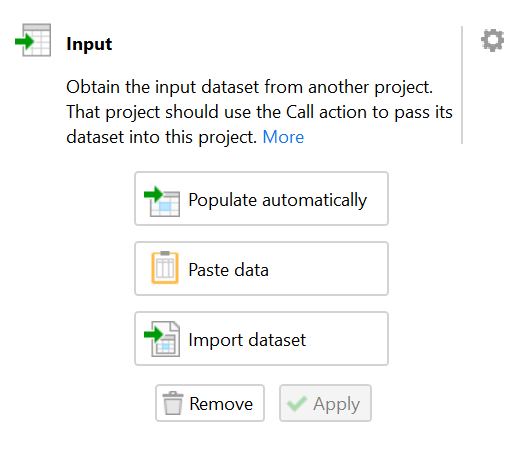
If you look at the settings for the Input action, instead of the usual settings and parameters, you have instead a series of buttons to use to provide example data to the action whilst you’re developing the workflow.
Note: the “Populate automatically” option is intended for when you are calling the module from within the same project and won’t work in this instance.
Returning data from a custom action
Having built the rest of your custom action, depending on the type, you may wish to return data back to the workflow which uses it. Again, there is nothing new about how this works as it uses the same mechanism which EasyMorph has had for a long time.
Note: The following isn’t strictly necessary as we can choose which table to act as the result when we publish the custom action to the Hub. However, it’s generally considered best practice to explicitly set the default result table so that should we modify the workflow in the future adding more tables, our intended result will still be set.
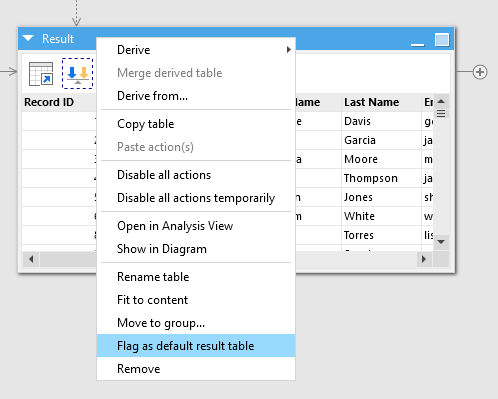
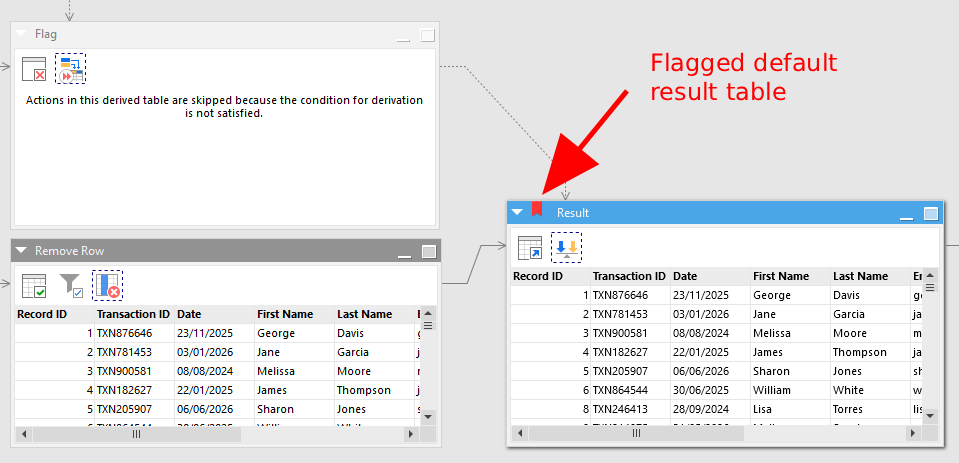
In any module, a single table can be flagged as the “Default result table”. This table will be the one that is then returned from the module to whatever called it. As described above, a single module is flagged as the start module which is run when the workflow is called, and thus we must flag a table in this module.
If we right click on the header bar of any table, we can select “Flag as default result table” from the menu.
Like when we flagged the start module, the table will then show a little red flag in the title bar to indicate this is the default result table.
Building our first custom action workflow
Now let’s get down to the most interesting part - creating your first custom action. Rather than walk through how to create each type of custom action, let’s look at creating a Transformer action which supports both passing data to and getting data back from the action. You can then apply the same information and techniques to the other types, following the information above about what each type supports.
Let’s create a workflow to use as a custom action which sends data to an API and returns a table containing the result of the call. The API I’ve chosen belongs to a system called Marketo, a marketing automation platform. But you could apply the same techniques to any REST API, or any transformation for that matter. Specifically, I want the action to allow me to append new marketing leads to a custom list in Marketo.
As with all workflows, as we wish to communicate with a 3rd-party database or system, the first step is to set up a connector to handle the connection details for the API, including authentication.
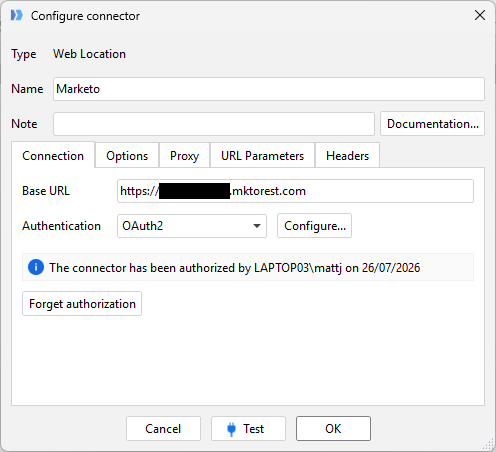
Marketo’s API uses OAuth2 for authentication, but your chosen API might use a different method. Check out the EasyMorph help topic on Web Location Connectors for more information.You’ll need to find the necessary information for the API you wish to connect to. For Marketo, we’ll need:
-
The URL to the Marketo instance API..
-
A Client ID and Client Secret to use to authenticate.
-
The email address of the user which created the authentication credential to use as the OAuth scope.
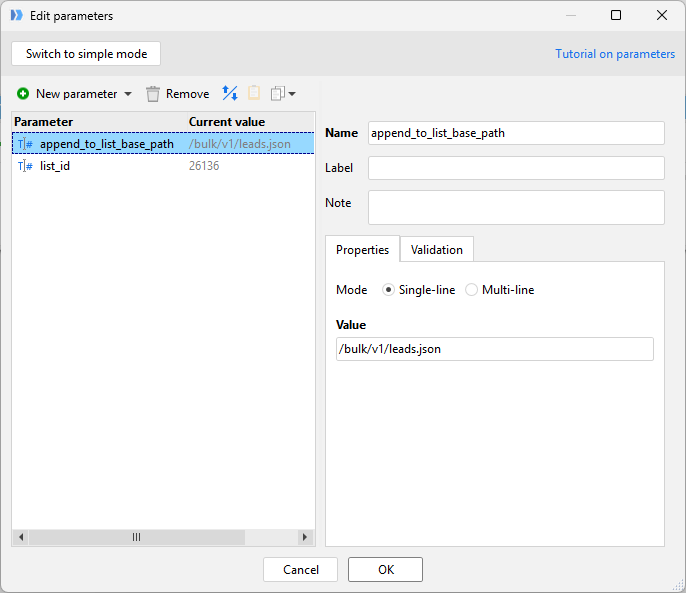
Now we have a connector configured, we can begin building our workflow. Let’s add a couple of parameters as follows:
-
append_to_list_base_path (Text or number parameter) - to hold the specific API endpoint path which handles appending records to a custom list. I’m adding this as a parameter to make it simple to change in the future, such as if Marketo releases a new version of their API.
-
list_id (Text or number parameter) - to hold the ID of the custom list in Marketo to which we want to append the records.
As we want to pass a table of leads to the custom action, we need to begin with adding the Input action and provide it with a temporary table as described above to help us build the workflow.
The API endpoint we are going to interact with needs us to attach to the call a CSV file which contains the data. So let’s output the leads to a temporary CSV file using the Export into delimited text file. We can delete it once the call to the API has been made.
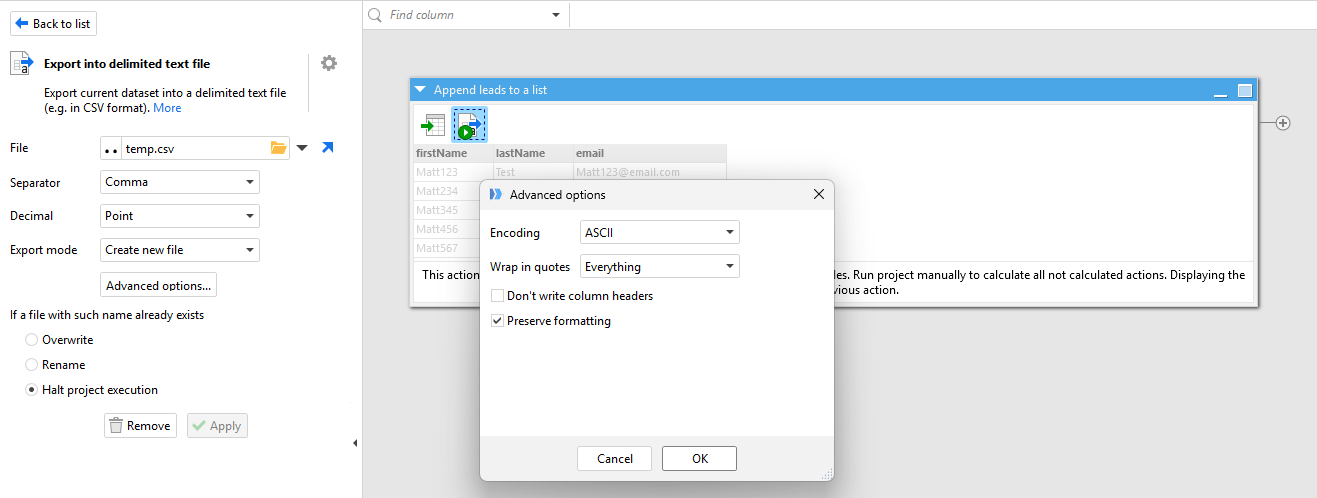
Within the action’s settings, click on the “Advanced options…” button and change the following options:
-
Encoding - Select “ASCII”.
-
Wrap in quotes - Select “Everything”.
You can leave any other options as the defaults. Don’t forget to run the action so that we have the file available for the next step.
Now we can make the API call using the Web request action and configure it to send the file and necessary information to the API endpoint as follows:
-
Connector - Select the connector for Marketo which we configured above.
-
Request method - Select “POST”.
-
Path - Set it to use the “append_to_list_base_path” parameter we created above.
-
Body
-
Body is - Select “File”.
-
File path - Select the temporary CSV file we created in the last step.
-
Specify charset - Tick the box and select the “ASCII” option to match the character set we used when exporting the CSV file.
-
Select the Upload file (multi-part upload) option.
-
File name - Set it to “file”.
-
Additional parameters - Tick the box and enter 2 parameters as follows:
Name Value format csv listId list_id (one of the parameters we created above)
-
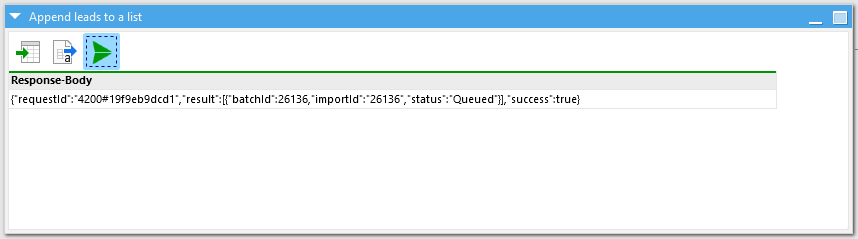
If we run the Web request action, we should hopefully get a response from the API which contains JSON which indicates whether or not the records were successfully added to the list.
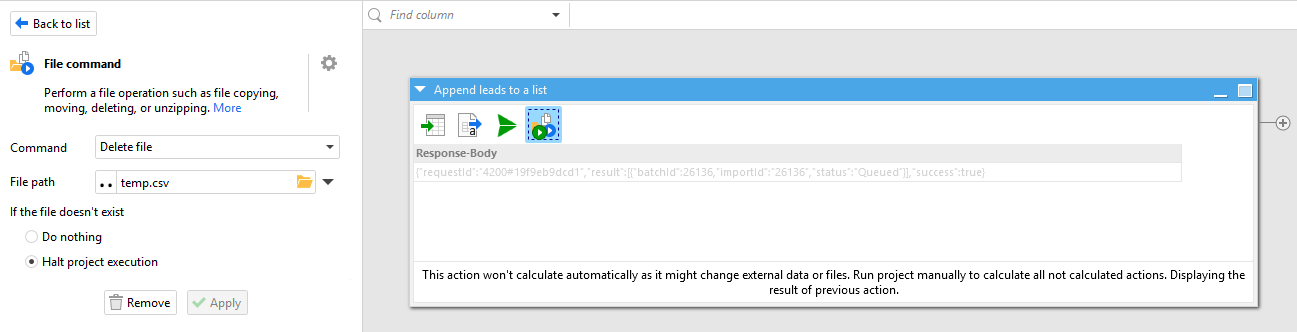
Having made the call, we can now delete the temporary CSV file using the File command action configured to use the Delete file option.
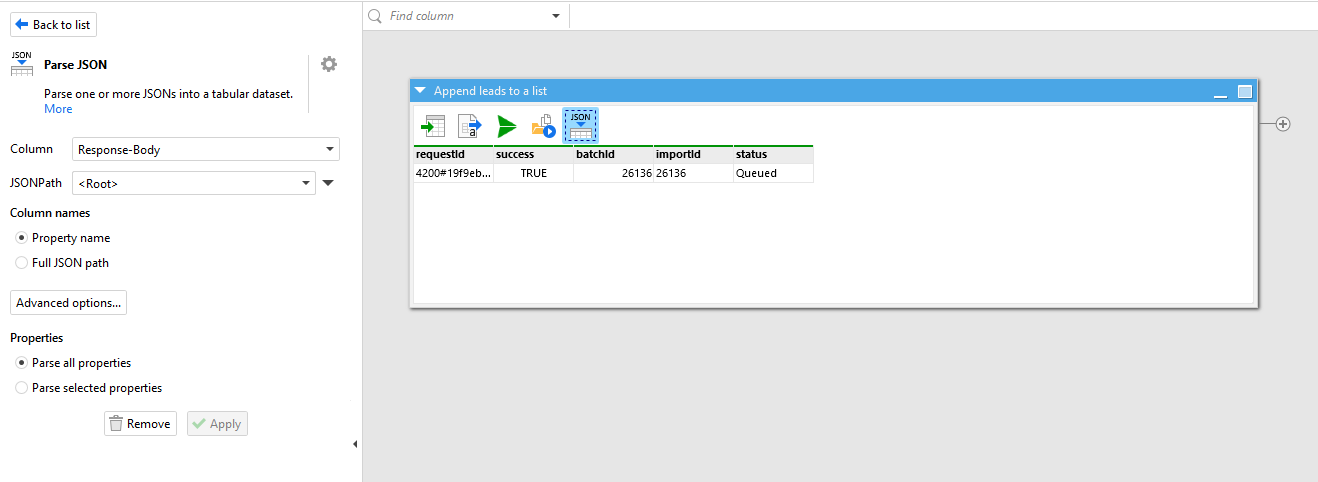
And finally, rather than returning JSON, let’s add one more action to unpack it into a tabular form instead, so that it is easier to make use of in any workflows which call the custom action. We can do this with the Parse JSON action.
We should, of course, run the whole workflow and check it succeeds and that we can see the new records in Marketo. And that’s it. We’ve created our first workflow to power a custom action.
Download: If you want to download this workflow you can here:
Marketo Append.zip (4.1 KB)
If you wish to use it for your Marketo instance, you’ll need to configure the embedded connector with the appropriate URL and credentials. Embedded connectors can be found on the Project tab.
Publishing our workflow as a custom action
Now with our workflow created, we need to publish it to our EasyMorph Hub Explorer Catalog. Make sure you have EasyMorph Desktop linked to your EasyMorph Hub and then click on Publish to Catalog from the Project tab menu.
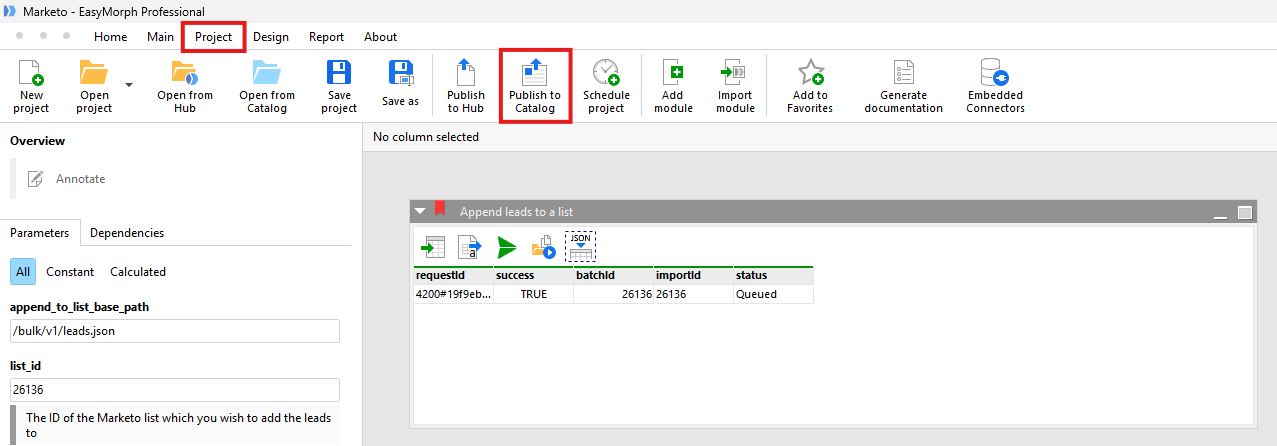
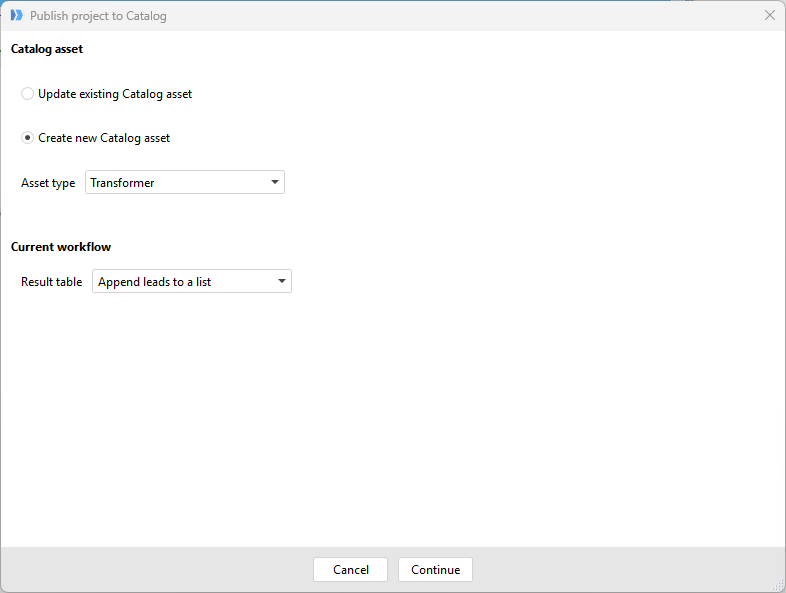
In the dialog that appears, select the option to Create new Catalog asset and select the Asset type of “Transformer”. Because we flagged the default result table when creating the workflow, EasyMorph should pre-select for us the correct table as the Result table. Click on Continue when done.
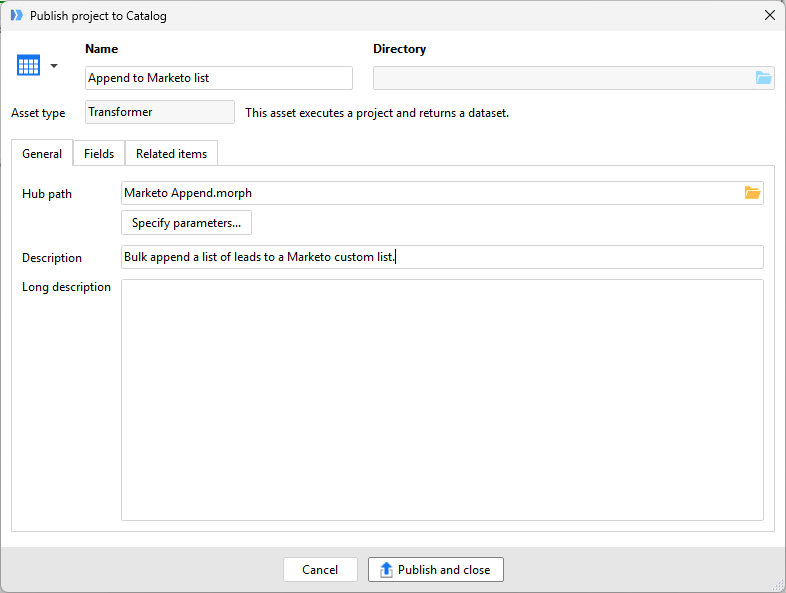
In the window that appears, we need to give our custom action a Name, select a specific path on the Hub to save the file to (including the file name), and optionally set a Description and Long description.
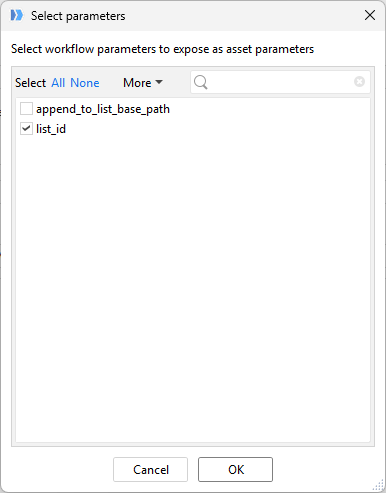
We also need to ensure that the custom action asks for the “list_id” parameter when we come to use it. Click on Specify parameters… and tick the box next to the “list_id” option. We don’t need to check the box next to the “append_to_list_base_path” parameter as we don’t expect users to have to edit this when using the custom action. Click on OK when done.
Click on OK and then Publish and close. And we’ve published our first custom action ready to use.
How to use the custom action
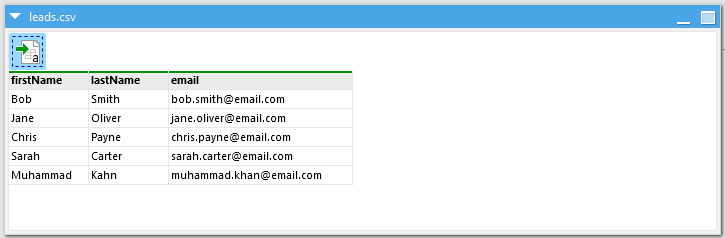
Using a custom action is just as simple as using any of the in-built actions. Let’s create a new EasyMorph project, load some data and add our custom action.
If we click on Add action to open the left-hand action list, if we have EasyMorph Desktop successfully linked to EasyMorph Hub, we’ll see an option at the top to switch between Standard actions and Explorer assets.
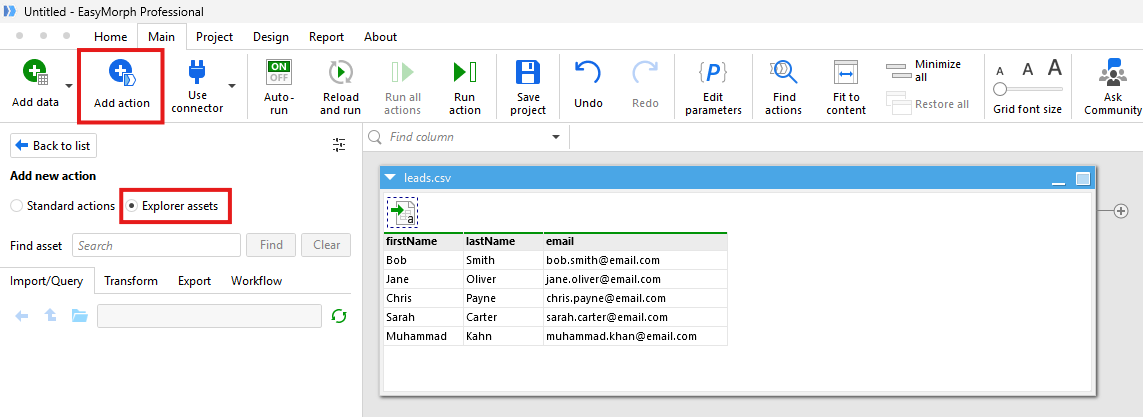
When we select Explorer assets we will see that there are 4 tabs, each labelled as one of the different types of custom actions we discussed at the start of this post. We published our Marketo custom action as a Transform type so if we click on this tab, we should be able to see our custom action.
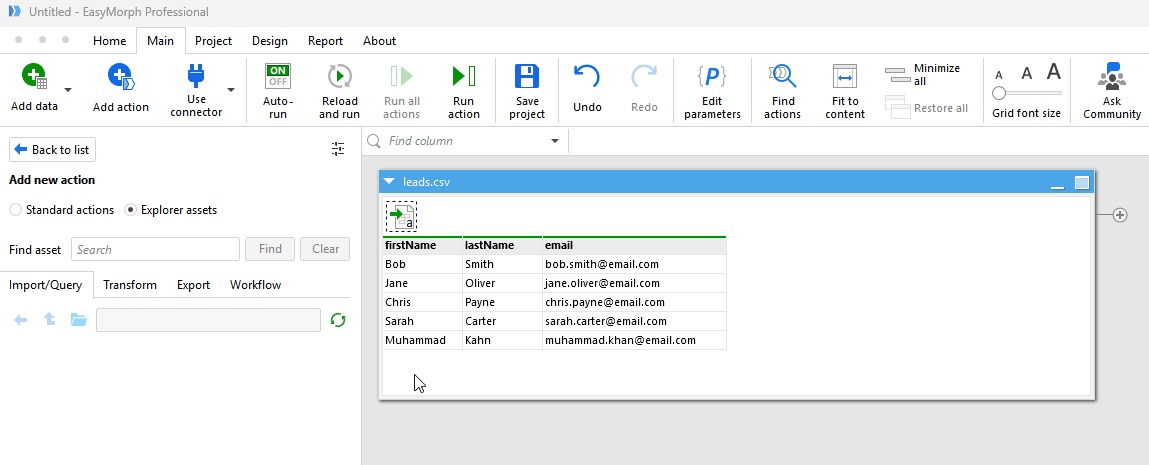
If we drag-and-drop the custom action into our workflow in the same way we can in-built actions, the left-hand bar will display the settings for the custom action, referring to the parameters we created in the workflow and selected when publishing. And running the action should show us the small output table indicating if the custom action was successful at uploading the data to our Marketo list.
Conclusion & Other Examples
Custom actions are one of my favourite features. The possible use cases for what you could create a custom action to do are almost endless. As well as the example above, here are just a few more to get your started thinking of all the ways you could use them in your organization:
-
A custom action to validate whether a column of email addresses contains any invalid entries. Email Validator.morph (6.9 KB)
-
Protect an important database by using a custom action to handle performing the query to the database, but only if the user requests a maximum of up to 3 months of data: Parameter validation allows us to fail and provide a suitable error message if they try and extract too much. You could even check the current time and return an error if they are trying to extract data within critical business hours. Extract Sales Data.zip (116.6 KB)
-
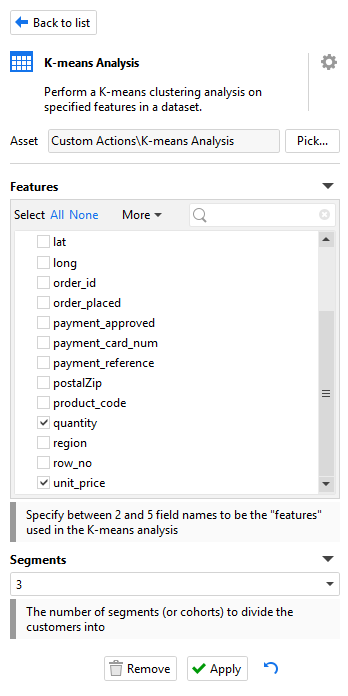
Perform a K-mean clustering analysis on a set of data, using EasyMorph’s tight integration with Python. Provide parameters so the user can decide which fields to use whilst grouping records and how many cohorts they should be grouped into.
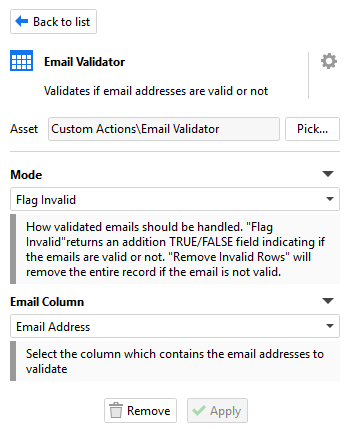
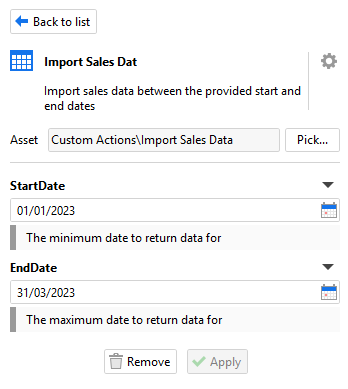
We’d love to hear all of the ways you are using custom actions or the ideas you have for them. Leave a comment below and let us know.