Adding Okta identity provider via OpenID Connect
This article shows how to let users sign in to EasyMorph Hub with their Okta accounts, using an OpenID identity provider. This feature is available starting from version 6.1.0.
Prerequisites
You will need:
- administrator access to EasyMorph Hub;
- administrator access to your Okta organization.
The examples below assume the following addresses:
| Service | Example address |
|---|---|
| EasyMorph Hub | http://localhost:6330 |
| Okta organization | https://<your-org>.okta.com |
| Okta Admin Console | https://<your-org>-admin.okta.com |
Adding an OpenID identity provider
-
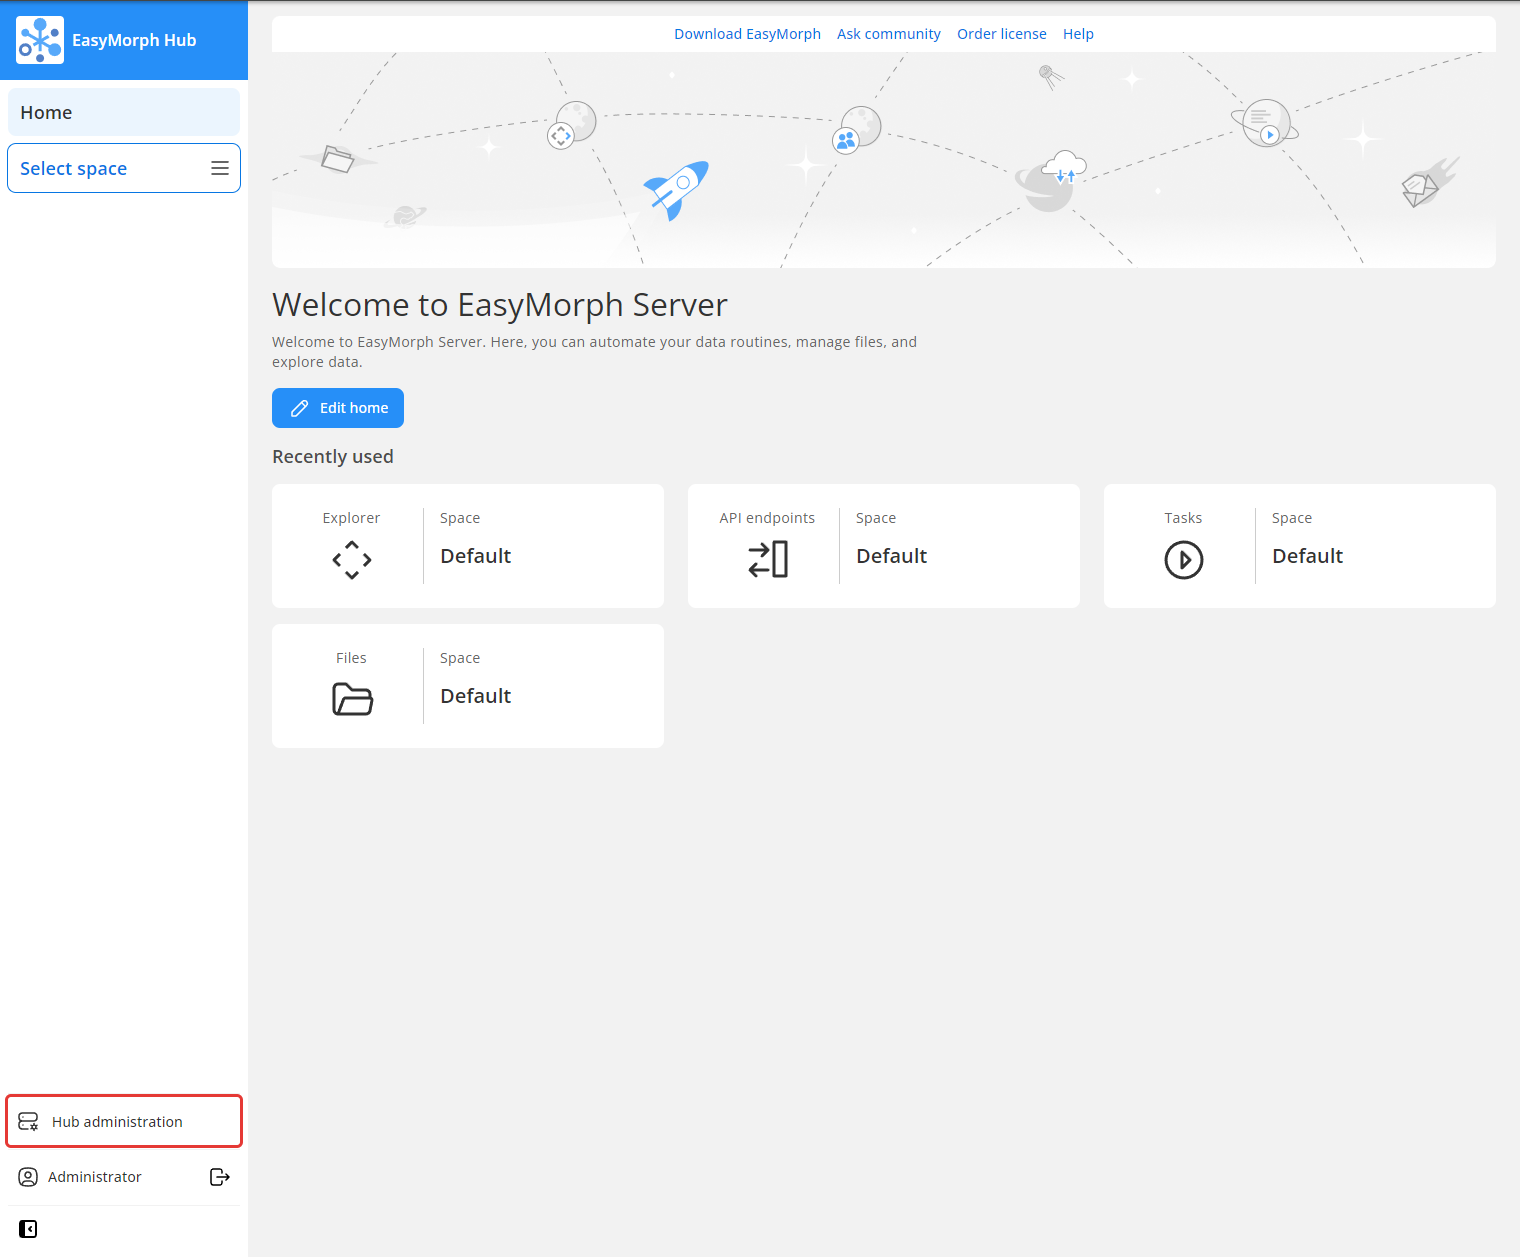
Sign in to the EasyMorph Hub web console as an administrator and go to Hub administration.
-
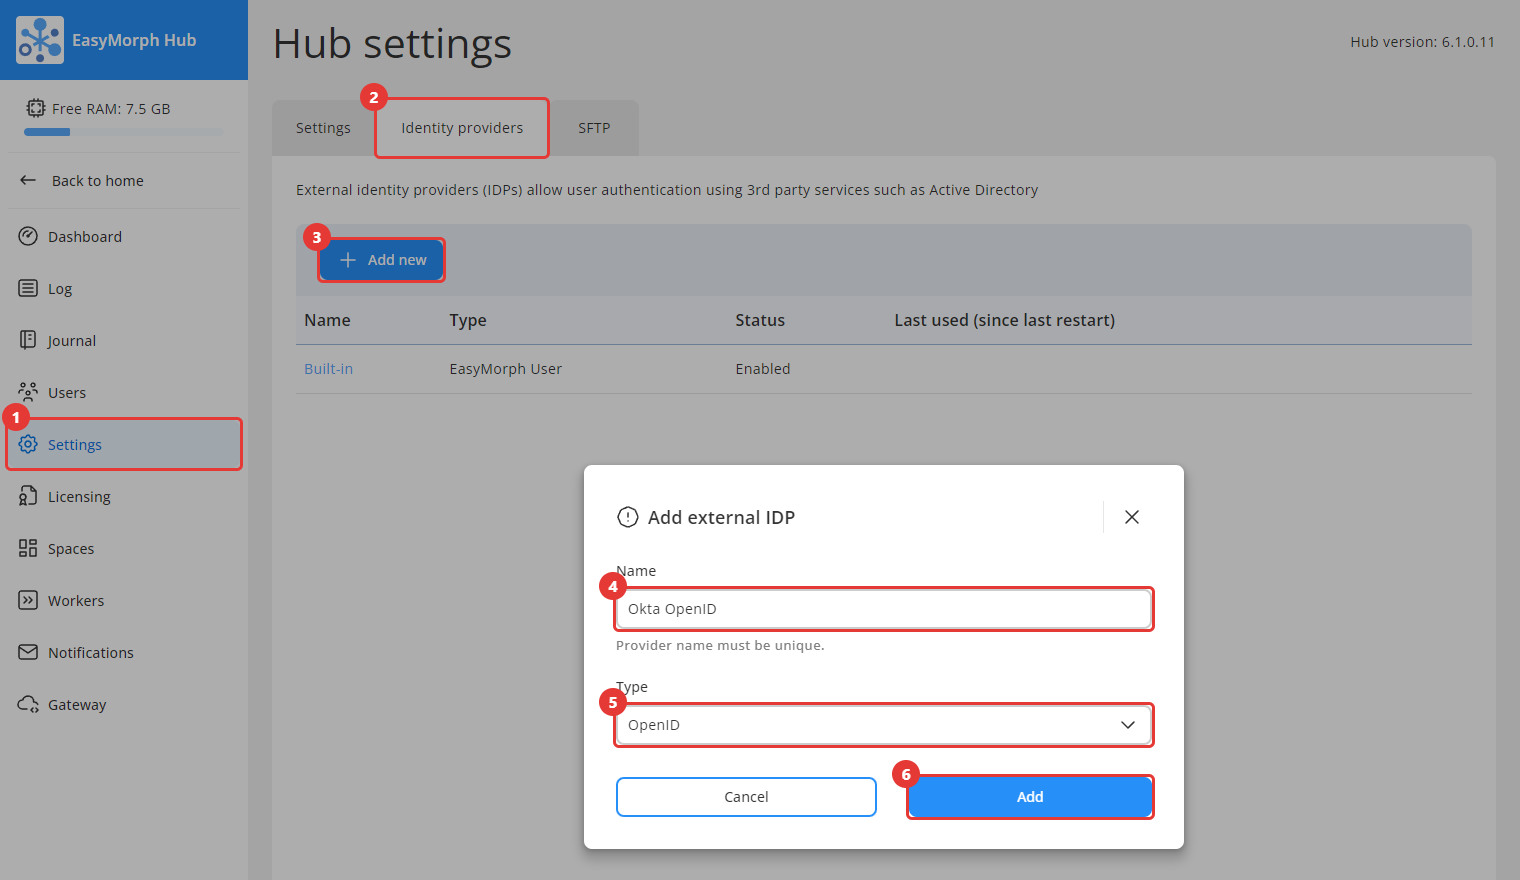
Go to Settings → Identity providers and click Add new. In the Add external IDP dialog, enter a unique Name (for example
Okta OpenID), select OpenID as the Type, and click Add.
-
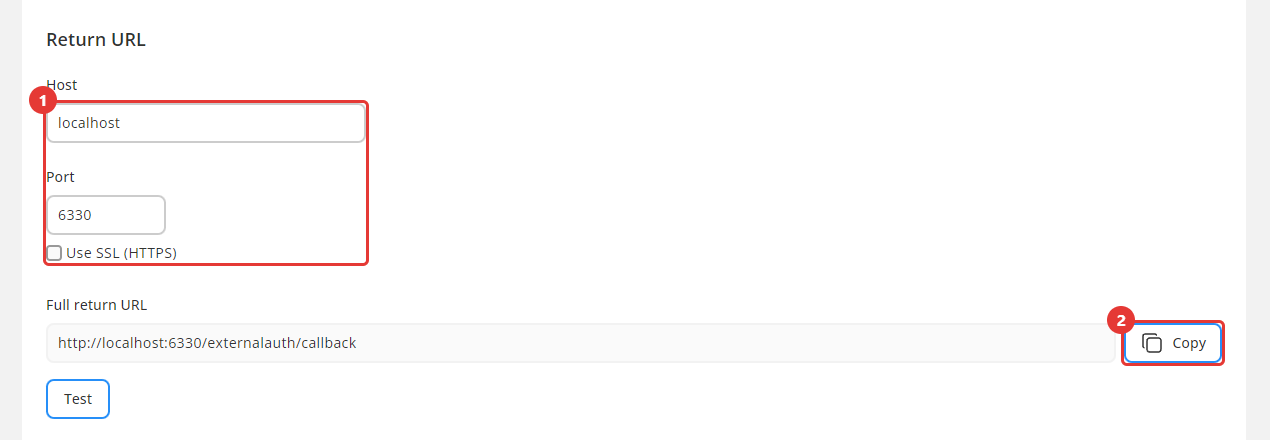
In the Return URL section, check the address that users open EasyMorph Hub with:
- Set Host and Port, or keep the default values. Check Use SSL (HTTPS) if EM runs over HTTPS. The return URL changes with these settings.
- Copy the Full return URL. Okta redirects users back to this address after they sign in.
Keep the page open. You will come back to it after setting up the app in Okta.
Creating an app integration in Okta
-
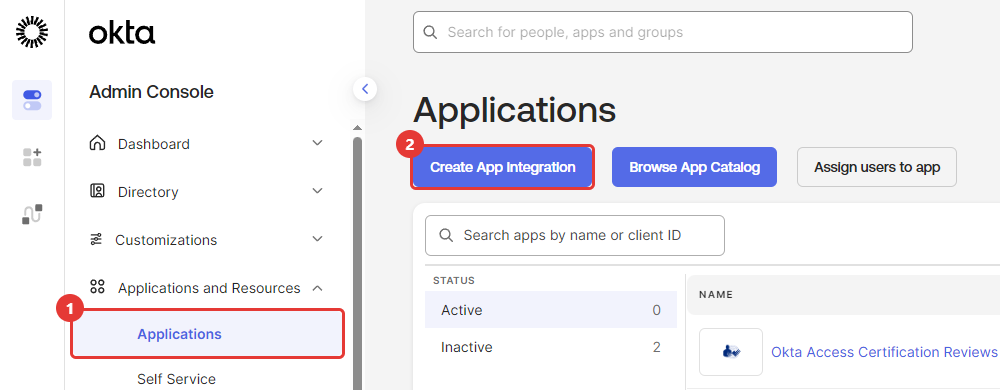
Sign in to the Okta Admin Console. Go to Applications → Applications and click Create App Integration.
-
Select OIDC - OpenID Connect as the Sign-in method and Web Application as the Application type. Click Next.
-
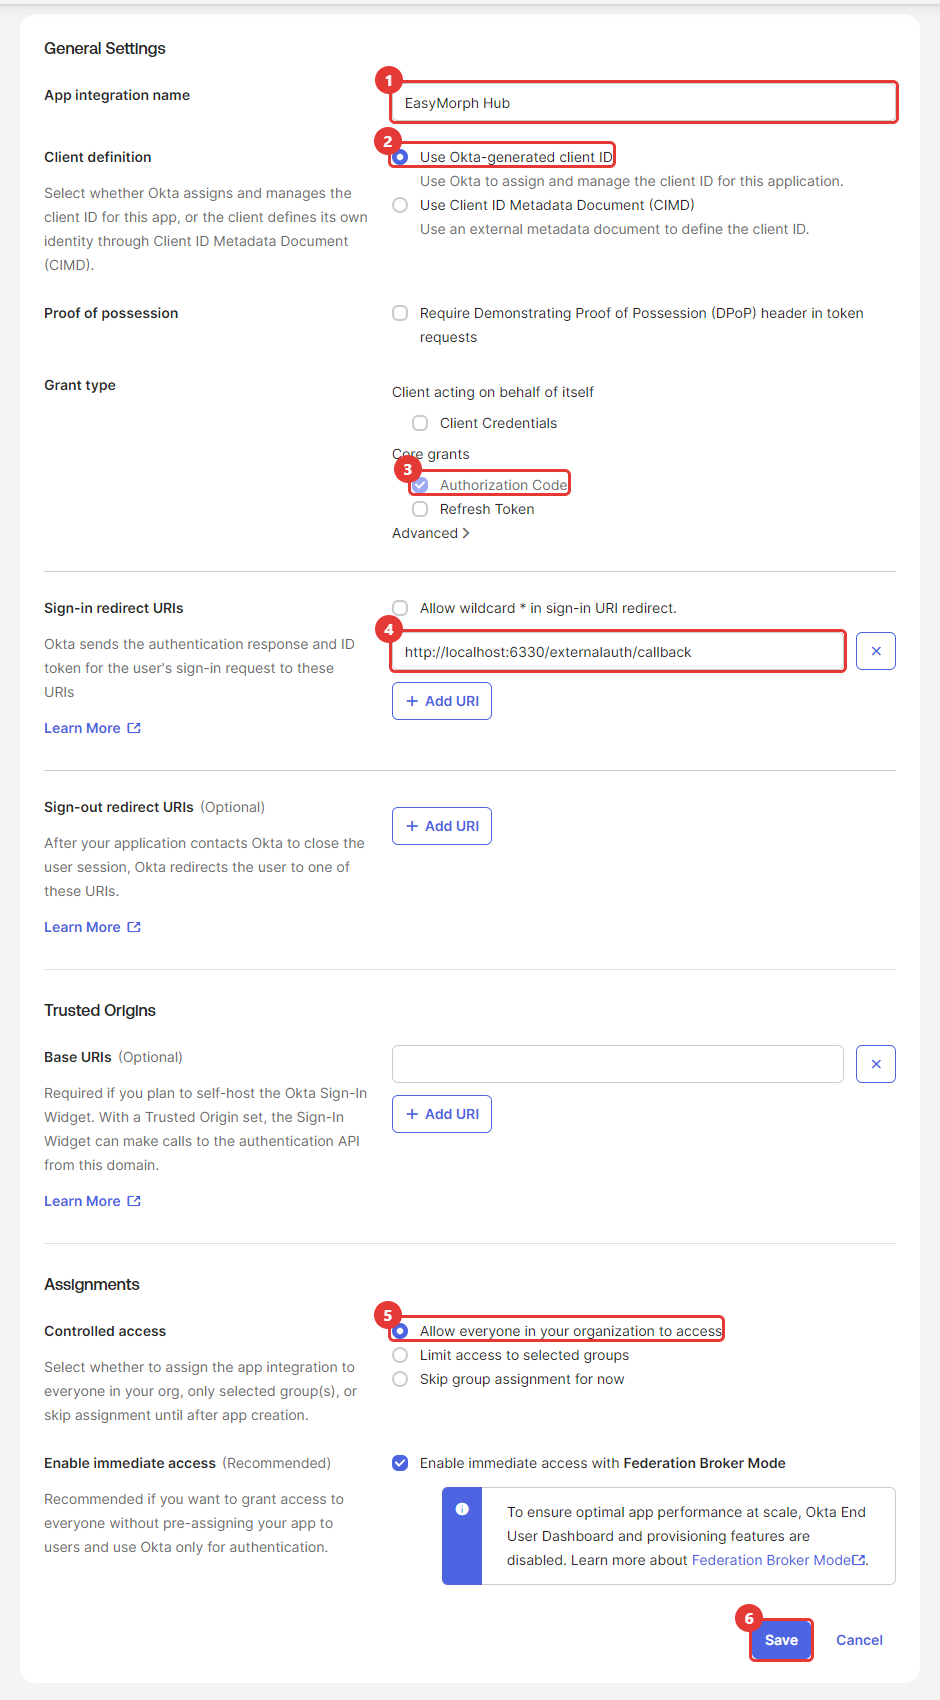
On the New Web App Integration page:
- Enter an App integration name, for example
EasyMorph Hub. Okta shows it to users when they sign in. - Keep Use Okta-generated client ID selected.
- Keep the Authorization Code grant type.
- Replace the default value in Sign-in redirect URIs with the Full return URL from EasyMorph Hub.
- Under Assignments, select who can sign in: everyone in the organization, or only selected groups.
Click Save.
- Enter an App integration name, for example
-
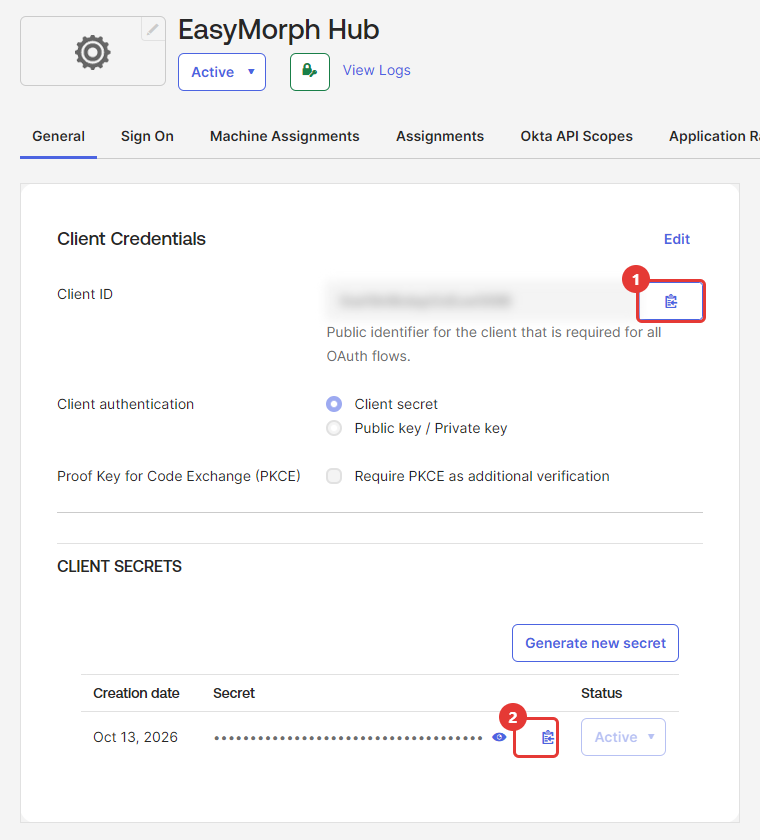
Okta creates the app and opens its General tab. Copy the Client ID and the client Secret.
(Optional) To make Okta require PKCE for this app, click Edit in the Client Credentials section, check Require PKCE as additional verification, and click Save.
Keep this page open along with the one on EasyMorph Hub.

Finishing the setup in EasyMorph Hub
-
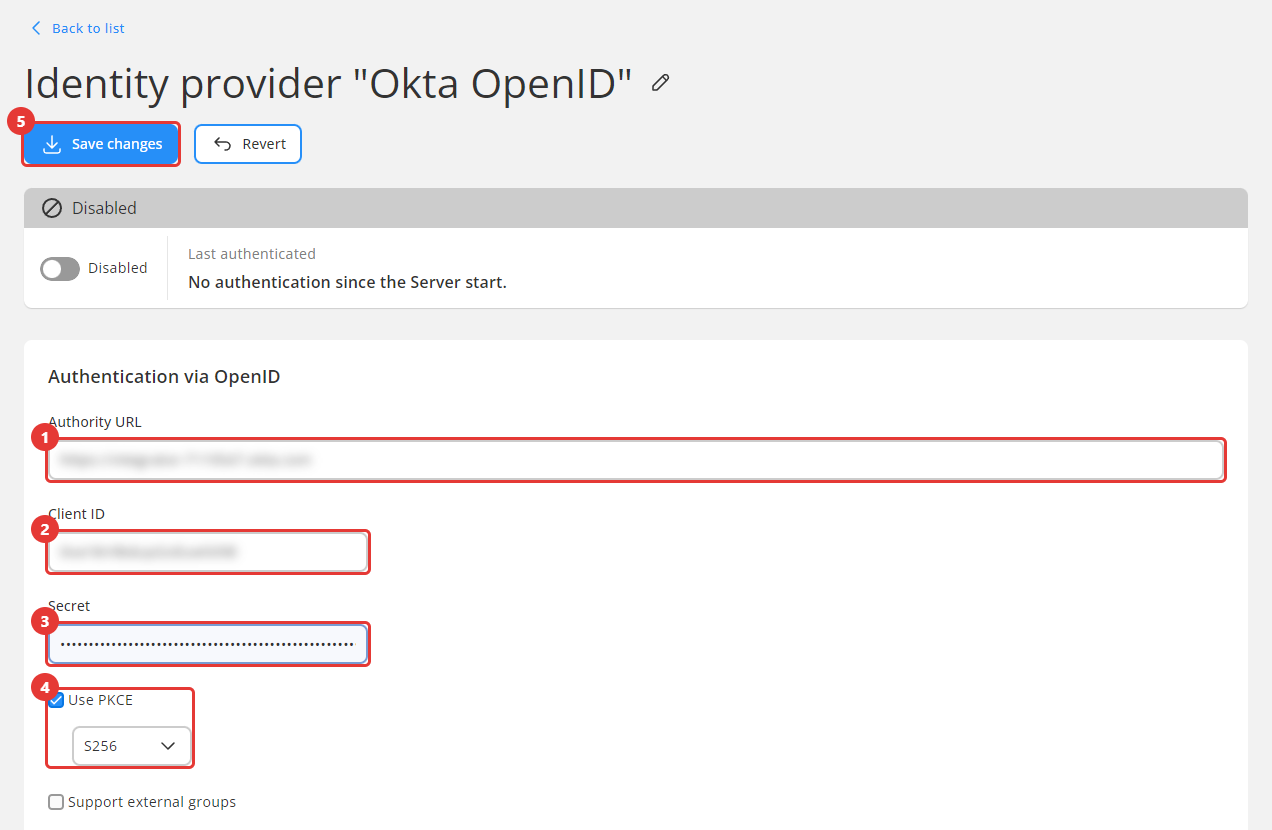
Go back to the identity provider page in EM and fill in the Authentication via OpenID section:
- Authority URL - the URL of your Okta organization, for example
https://dev-123456.okta.com. It is the Admin Console address without-admin. If you use a custom authorization server, enter its issuer URI instead, for examplehttps://dev-123456.okta.com/oauth2/default. - Client ID - the client ID from step 7.
- Secret - the client secret from step 7.
- (Optional, recommended) Use PKCE - check it and select
S256, the only method Okta supports. It is required if you turned on Require PKCE in step 7. - (Optional) Support external groups - check it and select Okta groups to use Okta groups as user groups in EasyMorph Hub. See Using Okta groups.
- Click Save changes.
- Authority URL - the URL of your Okta organization, for example
-
(Optional) Click Test - this verifies that the OpenID configuration is available from the given Authority URL.
-
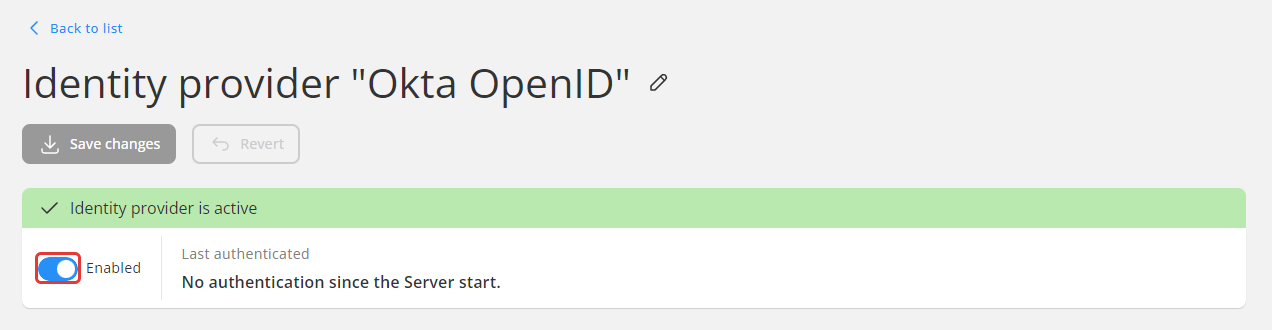
Turn the provider toggle to Enabled.

Users can now select the new provider on the EasyMorph Hub sign-in page and sign in with their Okta accounts.
(Optional) Using Okta groups
Note: Okta groups are supported starting from EasyMorph Hub version 6.2.0.
With Support external groups set to Okta groups, EM treats the user's Okta groups as its user groups. You can then give access to a whole group instead of single users.
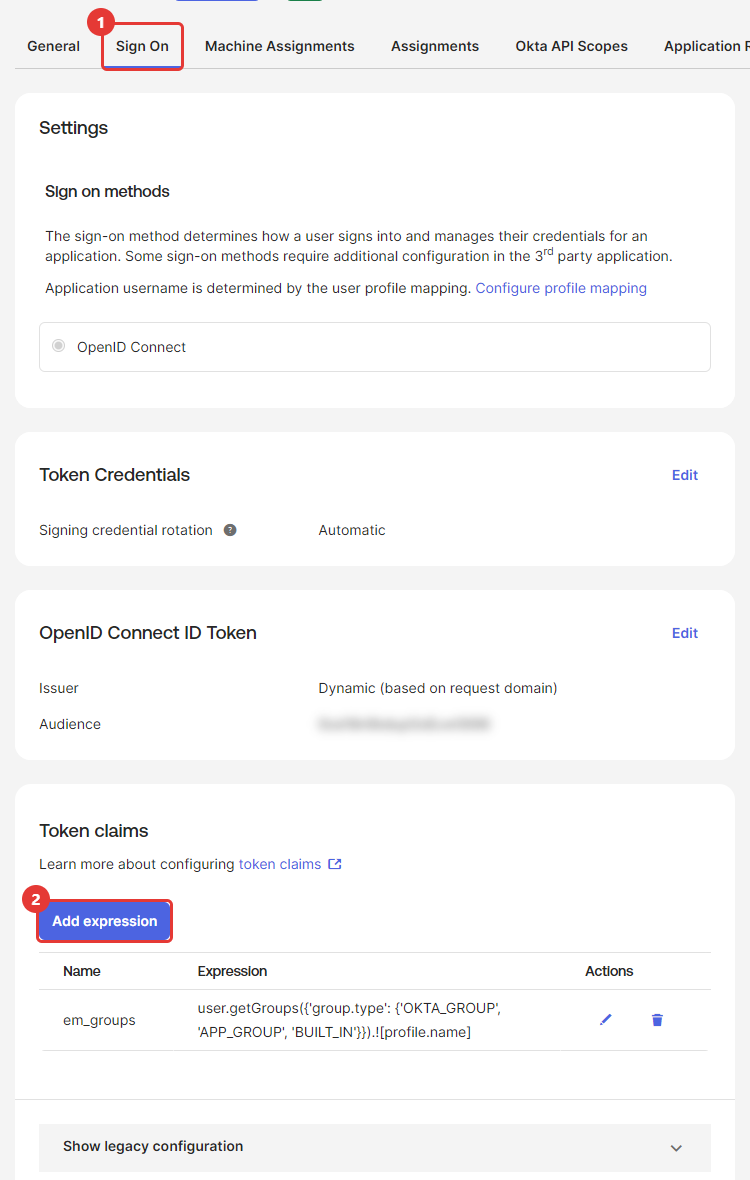
EasyMorph Hub reads group names from the em_groups claim of the ID token. Okta doesn't add this claim by default. To add it:
- In the Okta app, go to the Sign On tab and click Add expression under Token claims.
- Next, you can use one of the 2 options:
-
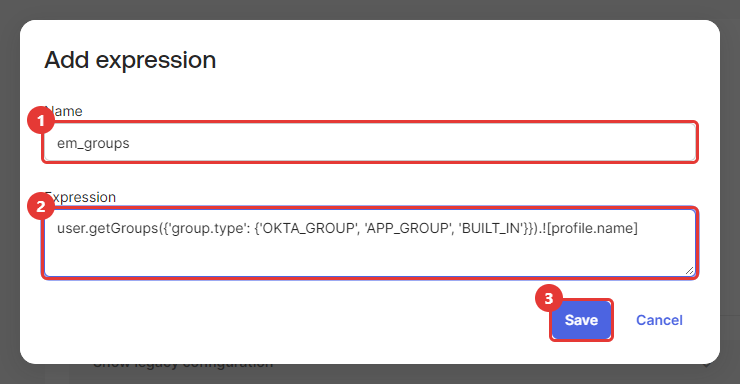
Enter
em_groupsas the Name and the following Expression, then click Save:user.getGroups({'group.type': {'OKTA_GROUP', 'APP_GROUP', 'BUILT_IN'}}).![profile.name]This expression returns all groups of the user: groups created in Okta, groups imported from other apps (for example Active Directory), and the built-in groups. You can customize it as you see fit, see Okta group functions.
-
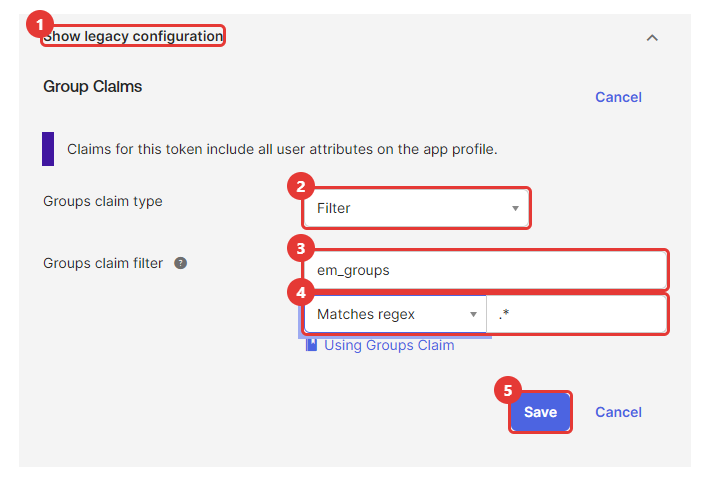
Instead of the expression, you can also use the legacy groups claim. Click Show legacy configuration, then Edit in Group Claims. Keep Filter as the Groups claim type, enter
em_groupsas the claim name, select Matches regex, enter.*, and click Save. You can also change filter type or regex depending on your setup.
-
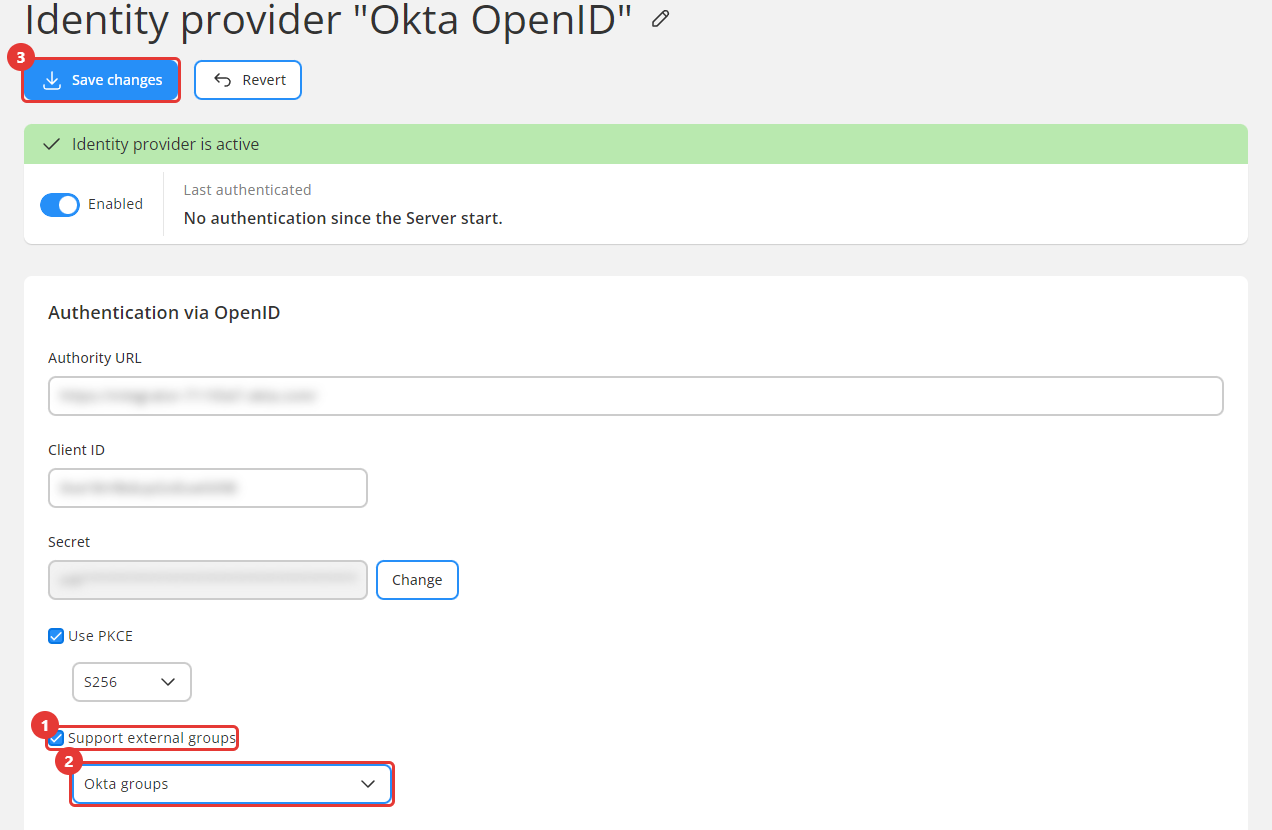
- In EasyMorph Hub, check Support external groups in the identity provider settings, select Okta groups, and click Save changes.
To give an Okta group access to a space in EasyMorph Hub:
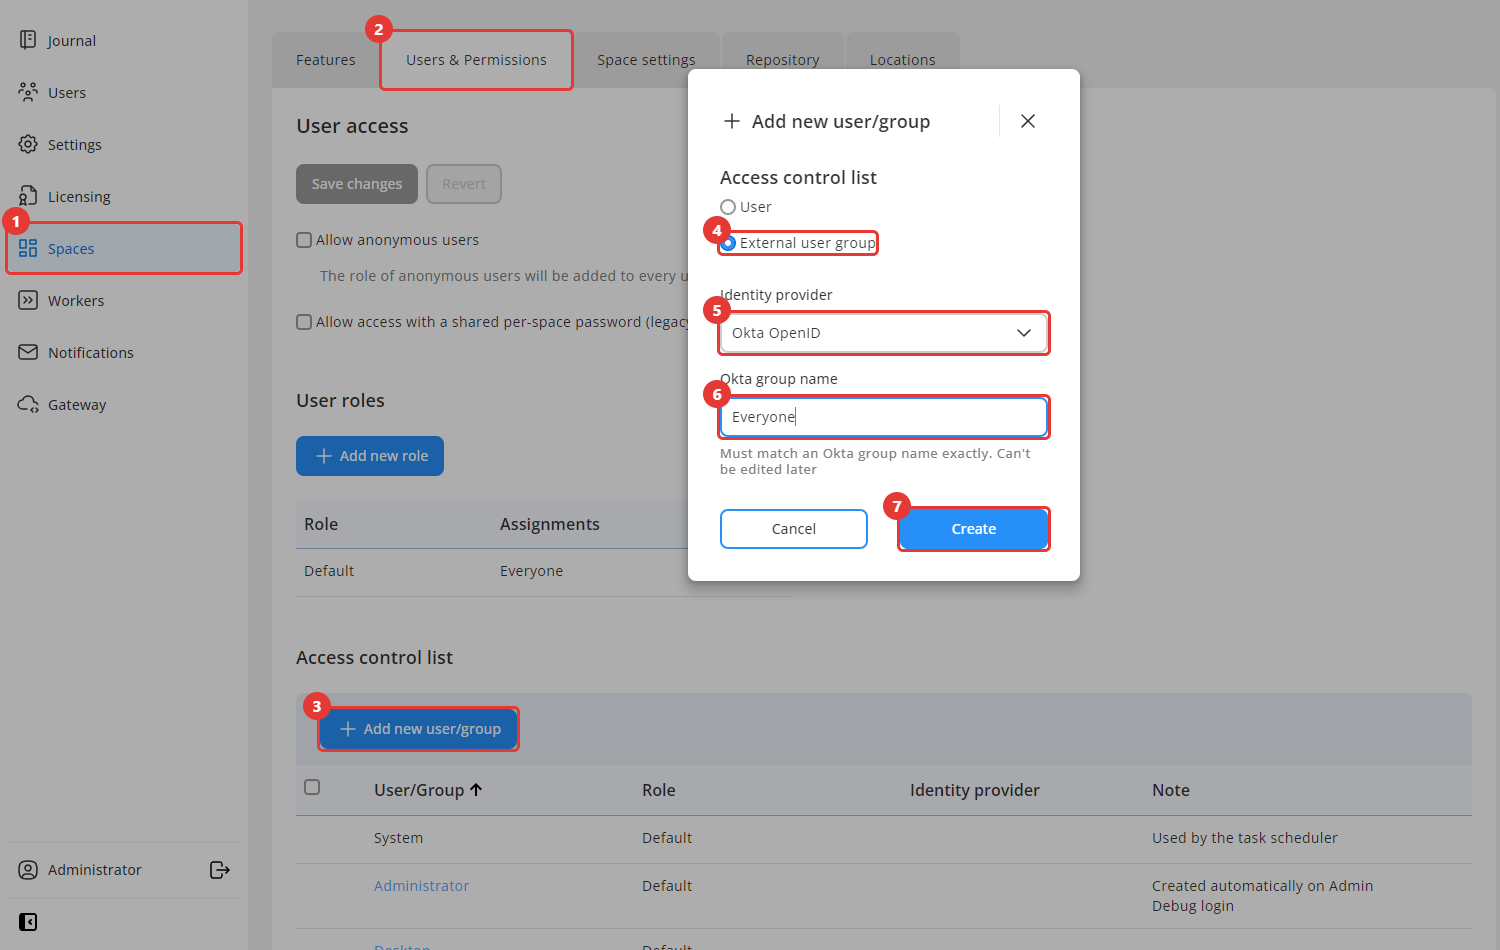
- Go to Spaces, open the space, and go to the Users & Permissions tab.
- Click Add new user/group, select External user group, select the Okta identity provider, enter the Okta group name (for example
Everyone), and click Create. Click Create again in the New group dialog.
- Assign roles to the new group in the Access control list, the same way as for users.
Note: groups are matched by name, not by ID. Enter the group name exactly as it is in Okta. Renaming a group will break existing bindings to EasyMorph Hub groups.